Monday, April 01, 2013

Pasg Hapus!


Egg coloring is always fun, not just around Easter. Masking seems to give the most interesting effects. Paints and markers seem to be a second choice with us. Turmeric, Beetroot, Hibiscus, and Greens are some of the natural dyes we like to use. But, food color is not taboo for us so we use them as well.


Oil pastel resist is a favorite. But, this year, eggs tie-dyed with rubber bands turned out to be the most satisfying.


Gado GadoGulai Telur, Egg Salad are all on the menu for this week, thanks to the two dozen colorful boiled eggs the kids made.

I finally sorted through the 100 odd photos Ana clicked during her visit with Nana. About 80+ photos were focused on derrières and nose hairs. No surprises there.

Of the 20% that weren't blurry indoor pics, a handful were truly beautiful - albeit to a doting mommy's eyes who realizes that these were most probably happy flukes. And not surprisingly, they were pictures of animals in their element. The binoculars close-up took me a while to figure out, though.


Labels: , ,

Tuesday, February 14, 2012

Kids Art: Watercolors Valentine Hearts


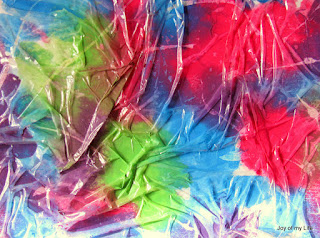
Watercolor Cling wrap is a favorite project in our house - Ana and I do it on and off, for fun. Oggie is just now getting into it.

Rubber Cement masking is another fun project we enjoy.

Here, we combined rubber cement masking and waterclor cling/plastic wrap ideas to make sheets of colorful paper which we then cut into heart shape valentine cards.

The hardest part of this project is the wait: waiting for the rubber cement to dry and waiting for the watercolor to dry so the plastic sheet can be peeled off. We did these steps at night so we can set it for drying overnight which worked out well.

And we did the project about a fortnight ago - started out as just another Weekend Art Morning with Mama and then ended up as a Valentine Heart Cards Project.

Oggie enthusiastically did all the steps right from mixing the colors, to testing if it is finally dry so as to cut out the hearts.

If an eyebrow inadvertently raises on the heavy use of blues and greens rather than pinks and purples in this project, it is by Oggie's design, uninfluenced. No, no, nothing about 'boy' colors or 'girl' colors, no such stereotypes is encouraged... just that ever since he could communicate in his own way, he has been strongly attracted to blue, despite being offered other color choices.

And as of yesterday's tally, Og's first favorite color is blue, second is red, third is green, fourth is yellow... eightieth is grey, ..., hundredth favorite color is pink.

Heavyweight paper works best as it doesn't buckle much and holds paints well. Since cling wrap is tricky for small hands, I use just a regular plastic grocery bag. Save and reuse the plastic bag for art work of course, especially (and thankfully) since local grocery stores are not allowed to use plastic bags to bag the purchases for the customers.

I am digressing... back to the project.

Items Used:
  • heavyweight paper - I use the 9"x12" watercolor paper (90 lb) or acrylic paper (110 lb)
  • diluted tempera paint in various colors, or watercolors 
  • large paint brushes (preferably one for each color to keep the colors from getting muddy)
  • a plastic grocery bag cut open to form a flat-ish sheet large enough to cover the 9"x12" paper
  • optional: heart-shaped cookie cutter, pencil, scissors

Note: If using rubber cement masking, allow plenty of time for drying. Apply the rubber cement, allow to dry completely. Don't peel off  the rubber cement. Use this paper with the dry rubber cement on for the watercolor cling/plastic wrap project as below.


  1. Get the paints ready: mix the colors as needed, dilute with water to a buttermilk-like consistency; preferably use a separate brush for each color; I limit the colors to 3 or 4 at a time for the 3 year old so as not to get it all muddy


  2.  Pick up one color at a time and make blobs/blotches on the paper;  Cut the 9"x12" paper to any size, if preferred; for the first trial with Og, I cut a 6"x6" square so a large canvas does not overwhelm him; try not to mix the colors on the paper, keep the color blobs separate
  3. Lay the plastic sheet on the still-wet paint and scrunch it up with the hands while pushing down on the heavyweight paper; the idea is to get the plastic bag to stick on, spread the paint blobs a bit, and also form patterns that will look stunning when dry :)

    Watercolors fractals Valentine Hearts

  4. Allow to dry undisturbed; we usually set it by the heating vent in winters and within an hour it is dry
  5. Peel off the plastic sheet when dry; test a corner first to see if it is ready to peel.  then, remove the dry rubber cement mask to reveal the preserved whites (or layered colors) of the paper. Et violà!

    Watercolors Valentine Hearts


Labels: , , , ,

Monday, February 14, 2011

Kids Crafts: Valentine's Day Crafts

Kids Crafts: Valentine's Day Crafts

Valentine's Day has always been a low-key/no-stress event in our house even before the kids arrived. For the last couple of years, since Ana is interested in crafts, we do some themed craft activities around certain celebrations. And, since Valentine's Day has come to signify a celebration of friendship and love, we make something to give to friends and loved ones to show that we care.

This year, we made Salt Dough Hearts. The procedure is the same as described in the Salt Dough Creatures post. We used a cookie-cutter to cut the shape, poked a hole for the ribbon we wanted to add later on, and baked it. After it cooled overnight, we painted it red. Then, Ana added From: and To: for her friends.

Kids Crafts: Valentine's Day Crafts


We also made heart cards using card stock paper and one of our favorite techniques: rubber cement masking. Ana loves watercolors. She had fun combining rubber cement masking with salt sprinkled painting to make a few sheets of paper. We let it dry. Then, cut into hearts. Ana meticulously wrote the names on each card.

Kids Crafts: Valentine's Day Crafts rubber cement masking watercolor hearts

The technique of folding the paper in half and cutting a "question mark shape" as Ana puts it, is an easy way to get neat little hearts cut out from paper. But, card stock being thick, and not wanting a fold in the middle of the beautiful card, we went with tracing out the heart shape and cutting them out, even if slightly more tedious.

Kids Crafts: Valentine's Day Crafts ripped tissue paper hearts

Oggie got into the spirit and wanted to "make hearts" too. So, we went with the old technique of ripping tissue paper and gluing them on several layers to make a thicker tissue paper sheet as described in the Paper Chain Fairies, Fairy Flower Chain and Fairy Wings post.

Rip tissue papers (various colors, patterns) - this is the only part Oggie really enjoyed - layer them on a plastic sheet and glue on more layers to get a thicker colorful ripped tissue paper. Allow to dry completely. Peel off the plastic. Cut out the shapes.

Labels: , , , , ,

Tuesday, November 30, 2010

Kids Art: Mondrian-inspired Chalk Pastels

Kids Art: Mondrian-inspired Chalk Pastels and Paintings
A while ago, a study in Masking led us to use masking tape and paints to create very simple paintings à la Mondrian.

Thanks to the suggestion by one of Ana's school teachers (an artist) to get Oggie started on it, I was happy to introduce this activity to him and notice the concentration and joy with which he created his "pieces".

I didn't restrict the palette to primary colors, nor insist on simple horizontal/vertical lines.

Kids Art: Mondrian-inspired Chalk Pastels and paintings

Items Used: Masking tape, card stock paper, chalk pastels

  1. On a piece of card stock paper, apply the (relatively inexpensive) masking tape in horizontal and vertical lines allowing them to intersect to form blocks
  2. Color with chalk pastel - a different color in each block created by these intersecting lines - and smooth/blend the chalk pastels with a finger
  3. Carefully remove the masking tape et voilà! A unique piece of art

Kids Art: Mondrian-inspired Chalk Pastels and paintings
Variations:
  • Ana liked tempera paints in primary colors, Oggie preferred chalk pastels
  • White and black paper for stark effects
  • Also, using ruler, create thick dark intersecting lines with black marker and color in the blocks in between using markers
  • For Oggie, I taped the paper to the table-top using one or two pieces of masking tape first so the paper won't move when he is blending the chalk pastels; then gave him pre-cut pieces of masking tape to place as he wanted
Other similar art activities:
  1. Chalk pastels: Glue and Chalk Pastel Art
  2. Masking: Rubber Cement and Water Colors


Labels: , , ,

Saturday, January 23, 2010

Kids Art: Oil Pastel Resist

kids art easy oil pastel resist

We've been exploring resist painting on and off for a while now. First with crayons and wax candles, then with oil pastels (just the scholastic kind, which are not too expensive, and come in beautiful colors).

A firm believer in
I hear... and I forget
I see... and I remember
I do... and I understand
--Ancient Chinese Proverb
I try to provide some hands-on opportunities for my kids that not only exposes them to new experiences but enriches me with a better understanding of their strengths. I try. I don't always succeed, and there is always a lot to learn...

I remember, a few years ago, my 3 yr-old niece drew something that looked like a cross between a candy cane and a broom and exclaimed, "Horse!". And since then, it has been fun to see the "fairy" in Ana's squiggles and now the "sun" in Oggie's...

As described in a few books I was reading regarding art expression in kids, I like the idea of letting the child explore the textures, the interactions between various materials, and possibly allow for creative expression with an open-ended approach.

Incidentally, I've often wondered why "open-ended" has somehow come to connote lack of structure. Au contraire. Children work best within some sort of structure (so I've read and my observation so far seems to indicate the same). However, when the structure does not necessarily dictate the materials, method, and end result, I guess it is fair to denote it open-ended.

Initially, Ana just made scribbles on a piece of paper with crayons and painted over it with diluted tempera paints. Crayon resist or oil pastel resist, as the name suggests, resist the paints, which only shows through around the crayon or oil pastel lines.

Now, squiggles seem like a great way to explore lines - from straight lines to circle and every thing in-between.

Exploring continuous lines with same start and end points, or separate start and end points can in itself be a very rewarding exercise.

(Disclaimer: I am not an art expert, or even an early childhood education expert... I just enjoy reading about these topics from wonderful books and other resources, and exploring some of the ideas therein with my kids, which in itself is a great learning experience for me.)

Art Appreciation post in Saffron Tree lists some resources with good insight into the early creative process. In this context, Harold And The Purple Crayon brings some fond memories... especially when Ana drew Harold as holding his purple crayon standing at her easel in her room.

Some of the early chats I had with Ana about her chicken scratches was quite refreshing and eye-opening for me. I still treasure some of her special art expressions.

At 4¾, she has outgrown the abstract squiggles/swirls/doodles stage, itching to really represent - i.e., draw - the things she wants to.

She seems quite expressive sketching worlds and things from imagination. But, to represent something specific, something that she sees every day, to its likeness, seems a bit challenging. I don't want that to deter her from exploring or frustrate her in the process. We have started tracing exercises, just to demystify the drawing process.

Drawing is a specific skill that can be honed via proper technique and instruction when she feels ready for it. So, nowadays, when we look through books, she picks out the subjects/objects, then I sit with her and make rough pencil sketches to her satisfaction and hand them over to take it where she wants to. The impromptu "You are a good drawer, Amma!" makes me feel on top of the world sometimes.

She picks out her mode of expression at any given time: sometimes it is crayons, sometimes color pencil, sometimes markers, sometimes watercolors, sometimes chalk pastels, sometimes masking or any combination thereof. And sometimes it is this oil pastel resist.

Items Used: Oil pastels, watercolors, brush, heavy weight or card stock paper.

  1. Let the child make a sketch - can be swirls, squiggles, lines - just anything that the child wants to represent on paper (or, adult can make the sketch with the child's input)
  2. Apply oil pastel to the areas to be resisted by the paints. This could be the creative part the child gets to explore
  3. Wash with watercolors (or diluted inks or diluted tempera paints) all over the oil pastels and background
  4. Notice how the paints are resisted by the oil pastels;allow to dry

kids art easy oil pastel resist

Upon Ana's request, we've done some reptiles, some sea creatures, and will be working with butterflies and dragon flies next - whenever we are in the mood and the stars align themselves properly...

Some of Ana's color choices and representations look pretty dramatically stunning - at least to the maternal eye - while others just look like something Oggie threw up. However, it is the process , the experience, that I cherish more than the product, so, I treasure it all...

Incidentally, one of my favorites for art inspiration is Usborne Book of Art Ideas. It is brimming with ideas to try out for myself... and watching me do something with concentration and joy (and possibly effortless enthusiasm) hopefully inspires Ana enough to do her own exploration...

Labels: , , , , ,

Thursday, January 07, 2010

Kids Art: Rubber Cement Masking

kids art watercolor masking with rubber cement

Thanks to Winter Break, we had a lot of time to try different art projects. My primary aim has always been to expose Ana to the tools and techniques available these days and to allow for her creative energy to find a release. For one thing, she seems interested and shows some aptitude for it. If this was painful and boring for her, of course, I wouldn't dream of forcing it down her throat...

Oggie so far seems to love coloring, but, rather than the dainty 'artistic' approach Ana had at that age, Oggie at 1¾ seems to love the whole process of smearing as much as he enjoys seeing the colors appear and take shape on plain paper. I wouldn't be surprised if he chooses not to do the same art projects with me that I have done with Ana...

Continuing our study of masking, Ana and I tried the Rubber Cement masking technique.

Rubber Cement comes in a nice little container with its own brush. Its gummy texture is such that it can be dribbled over the paper by holding the loaded brush in the air and swirling it about. Of course, it can also be 'painted on' with the brush. Ana tried both techniques to understand that whereas one requires more control but forms nice curly lines, the other creates blobs.

I like rubber cement for certain applications. Its texture and the fact that it can be removed easily after it dries makes it an interesting material to play with.

Items Used: Watercolor paper, Rubber Cement, Tempera paints diluted in water (we were running low on watercolors), paint brush.

rubber cement masking with watercolors kids art

  1. Apply the rubber cement on the watercolor paper in any arbitrary pattern.
  2. Allow to dry. We placed it by the heating vent to speed it up - took about 5 to 10 minutes depending on how thick the application is.
  3. Then, paint over the dried rubber cement using favorite watercolors or diluted tempera paints. Allow to dry completely.
  4. Then, either using the fingers or a pencil eraser simply rub the rubber cement off. It peels off easily, leaving the white of the paper that it masked.

As always, Ana decided to make a few as she experimented with the technique and tried it to her satisfaction.

rubber cement masking with watercolors kids art

They came out looking beautiful enough to be framed and hung in the living room. Of course, that's just the maternal point of view :)

Labels: , , ,

Sunday, October 18, 2009

Kids Art: A Study in Masking

In the beginning, paints were just paints in my tender mind. Then around middle school, I discovered poster paints, watercolors, fabric paints/acrylics, oils; and, crayons weren't just crayons anymore, oil pastels, charcoal and such entered into my toolbox.

frisket liquid mask watercolor technique maskingBut, I didn't quite learn about how to get the best out of the various mediums until I also learnt about the various art papers available.

And then, I promptly got busy with getting my education and set aside anything that wasn't directly required for it.

A dozen-odd years ago, life opened up that door which I thought might remain permanently shut for me. The accessibility of library books and art supplies kindled my interest enough to start learning some simple watercolor techniques.

I used to meticulously do the practice exercises in the book, step by step, to get some sense for the power of subtly executed watercolors. Flat wash, graded wash, wet-in-wet, dry brush, masking, wax resist...

It is quite a challenging medium to master, for me at least, and am still in basic lesson 1, it feels like...

Masking is a basic technique in watercolor where selected areas are masked off first so the light/white of the scene can be preserved. Simple as that. Nothing to get excited about, or so I thought...

Usually, latex-based masking liquid (frisket) is used, which can be brushed on like paint into the areas we need to preserve, and allowed to dry. I remember using it for some Still-life exercises.

Once it is dry, the scene can be completed without worrying about colors running into those areas. When done, just rub with hand and the mask peels off leaving a crisply preserved white/light space.

Wax resist is another watercolor technique, as in batik dyeing for fabrics, that is easy to do but requires a bit of planning to get the most out of it. Crayons or plain candle wax can be used to preserve certain areas in the scene, but, as opposed to masking, the wax stays in the canvas and integrates with the painting usually.

I was interested in introducing Ana to a simple masking technique. I liked the idea of the mask coming off to reveal the white space preserved in the canvas after covering the areas with arbitrary shapes and then painting over as usual.
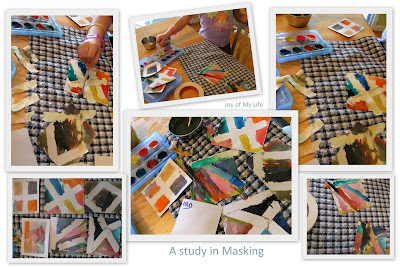
masking tape watercolor technique masking kids art

Rather than start with the slightly more expensive masking liquid, we used the good old masking tape which comes in many widths and colors. I had ¾ inch handy as it is quite useful, so we decided to work with it. It is designed for this purpose - and goes on easy, comes off easy.

Scotch tape - the magic/invisible kind that doesn't rip the paper off when removing - might work, but, I prefer masking tape. At about a dollar a roll for a fairly huge roll it is quite inexpensive, and has other uses around the house, especially for D.

And, as this is just a study, we didn't use the expensive watercolor paper, just card stock.

Items used: watercolors, paint brush, water, masking tape, card stock (or water color paper if handy), mini/travel blow-dryer (optional)

kids art watercolor masking technique

At first, to illustrate, I applied masking tape to the edges of the canvas and asked Ana to color as she liked. Then, to speed things up I used the blow dryer to dry off the watercolor. Then, showed Ana how to carefully remove the masking tape.

She seemed suitably impressed. So, I started a window pane pattern of mask for her and she went with it.

After that, she seemed keen on doing her own - to tape off patterns on her little canvas and paint away. It was interesting to sit back and watch her work confidently.

Being just 4½, I didn't want overload her, but she seemed have a lot of fun in the process... and, her genuine, "Wow! This is cool, Amma!" convinced me that such indulgences as these are worthwhile.

I am sure we'd be revisiting this technique on and off... maybe make non-straight-edged shapes (thinking pinking shears) for masking, then start on non-linear masking areas on the canvas and graduate to more intricate patterns... Oh, the possibilities!

Labels: ,

‹Older