Saturday, December 12, 2015

Kids Art: Penguins and Snowmen Winter Holiday Cards


The younger child is still fascinated with penguins and wanted to do some penguin cards, much like the penguin cards done in previous years.


So we pulled out our favorite Usborne book 365 Things to Make and Do from the book shelf and looked through for inspiration.

The thumbprint snowmen and penguins project idea immediately caught the kid's fancy.


Kids Art: Penguins and Snowmen Winter Holiday Cards


It's an easy enough project by itself, but, he wanted to add fancy backgrounds and action scenes inspired by Carol and Mark Buehner's Snowmen at Night -- an all-time favorite with both kids that comes out of the book shelf every winter to be read to bits.

But, acknowledging our combined limited abilities, the kiddo settled for something playful and silly but colorful.

Kids Art: Penguins and Snowmen Winter Holiday Cards


Chalk pastels being his favorite, we settled on cool winter colors for background, with white oil pastel making the snowbank in the foreground.


Kids Art: Penguins and Snowmen Winter Holiday Cards


All in all, it was a fun Saturday afternoon making these cute penguin and snowman cards.


Labels: , , , , ,

Wednesday, February 15, 2012

Kids Crafts: Painted Textured Paper Hearts


Whereas it appears that we have been doing a lot of arts and crafts with planned precision and focused execution, unfortunately it is not so... things just sort of happen and we go with the flow. It's mostly organic...

Every once in a while, I do like to try something new with the kids; so I try to gauge their interest and look for that window of opportunity to do it with them. Sometimes it turns out extremely satisfying, at other times it becomes a valuable learning experience.

I know I mention this often: Usborne Book of Art Ideas is one of my favorites for inspirational ideas to try with the kids on and off. Of course, I am always scouting for ideas, scouring the web, silently thanking the wonderful people who freely share their talents thereby allowing me to get away with minimal effort.

Handy as it is on the kids' bookshelf, many a weekend afternoon or weekday evening, left to her own devices, I've noticed Ana reaching for this book (among others) and flipping through the pages lazily until the amorphous idea in her head solidifies and spurs her into action.

One of the favorites from Usborne Books of Art Ideas is to make Textured (Painted) Paper, which we then use for collages and such. There are a few suggested techniques and plenty of room left open to come up with our own.

A couple of years ago, we used quite a few of the gorgeous papers from various art sessions for heart cards. Ana was inspired to do the same this year, digging through the cubby where we save the works we liked. She chose papers that were made with 6 different techniques.

1. Natural Sea Sponge and Tempera Paints: Simply dab the paper with the sponge and let it create the patterns and textures on the paper

2. Scouring Sponge and Tempera Paints: Drop small dollops of paint of different colors across the top of the paper and drag the scouring sponge down or across or in any direction, lifting and continuing till the paper is covered with paint. Coarse nylon scouring pads work well, makes strong lines like large brush strokes.


3. "Rain Painting" with Watercolor crayons or Watercolor pencils:  On heavyweight watercolor paper, just scratch on some colors using watercolor crayons or watercolor pencils; then leave the paper out in the rain. Let the rain drops wash the paper with interesting patterns. If left out in heavy rains, the paper will get soggy and fall apart, so, watch closely; use a brush and smear the water a bit to spread out the colors, if preferred. Allow to dry.


4. Salt-sprinkled Painting: As shared here


5. Watercolor Plastic Wrap: As done before Rather than the dark blues and greens that Oggie chose for his work, Ana chose to mix a pleasant lilac and powder blue.


6. Oil Pastel Resist: As in this post


Punch a hole; add a flower or a goody; write a message on the back; and a thoughtful, hand-made token of friendship is ready to give out to friends.

Oggie chose to give melted recycled crayon for his friends, along with the Watercolor Plastic Wrap cards he made for them. Same procedure as I've done before with Ana, except this time we used snowman moulds. Wrap one up in a piece of tissue paper, attach a heart card, and a special memento is ready for a friend. Who can refuse crayons? Especially multicolored ones?


Labels: , , , , ,

Thursday, May 20, 2010

Kids Art: Potato Stamping

kids art potato stamps

A while back, I had introduced Ana to using vegetables (and other found objects) for stamping and creating some form of art.

Potato Stamps are fun if we can manage to carve out the required design. That part has always been challenging for me. I can manage simple designs, common shapes, but nothing intricate so far.

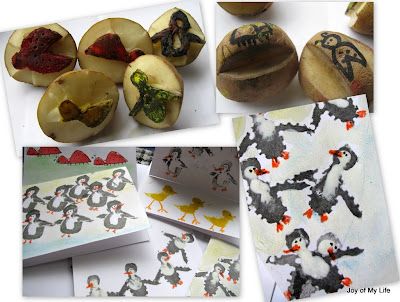
One soggy afternoon, both Ana and Og were playing with their respective penguin soft toys and wanted to create some art with penguins. Stamping seemed like something both the 5 year old and the 2 year old can do easily. So, I dipped into my bag of potatoes and decided to make simple penguin potato stamps.

kids art potato stamps penguins ladybugs

The first potato stamp I managed was technically the back of a penguin - convinced Ana that it is a penguin walking away. But of course, she wanted penguins jumping, sliding, looking goofy and walking towards us. So, we used ends of baby carrots dipped in white paint to add the white parts for the penguin. Then, orange crayon to add the feet and beak.

This one goes in the Save-For-Memory Box as I liked the explanation Ana had when she showed it to me after she was done: Penguins sliding down a snow hill, with one of them falling on top of the other at the bottom. It stuck in my head as she had deliberately stamped one penguin on top of another for this story. The background is done with chalk pastels over white paint.

kids art potato stamps penguins ladybugs

For Og, I decided to make the penguin with the white part carved out so he doesn't have to deal with carrot stamping for the white parts. After he was done with it on easel paper, Ana had a go at it making cards for her friends. Adding eyes, beak, and feet, giving each one a unique look, seemed like the best part of this activity.

kids art potato stamps penguins ladybugs

From there on, we tried ladybugs, chicks, ducks etc. - very simple shapes. I still can't carve well: Oggie most certainly wanted a T-rex, a Backhoe, a Dragon Potato Stamp and I couldn't quite do it, naturally - got the general outline that looked like a huge blob of some animal-ish figure... and Ana wanted a fairy, which is a bit beyond my current skills with X-acto knife and potatoes :)

But, considering the 50-odd little and not-so-little rubber stamps we have to meet all our stamping needs, I don't feel too terrible about not coming up with intricate potato stamps.

Also, I like home-made ink pads, especially for the little one's use: Drops of food color on a damp sponge... it stains the fingers a bit, but is washable and edible, especially since the little one puts everything in his mouth anyway. Plus, this allows for interesting effects when we put drops of different colors near each other on the same sponge - a multi-colored ink pad - and, a dab or so of water adds a nice effect - almost like inky paint.

And, with food color 'inks', I can rinse out and use the potatoes for cooking after a day as cut potatoes turn brown and start shriveling anyway :)

As always, inspiration comes from many places, but, for the most part, I love just about everything in Usborne Complete Book of Art Ideas book, including these penguins.

Labels: , , , ,

Tuesday, April 20, 2010

Kids Crafts: Paper Chain Fairies, Fairy Wings, Flowers, Butterflies

Easy Kids Crafts, easy kids craft fairy wings, Paper Chain Faeries, Flowers, Butterflies
Ana was excited about making decorations for her birthday party.

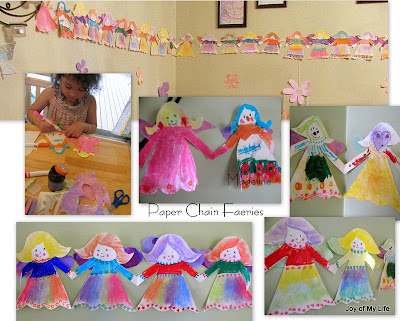
Paper Chain Faeries was the most fun, at least the first dozen or so that she helped make. Basically,
  • fold the paper a few times and cut out the shape making sure to leave the hands attached so it opens out to form the chain; we went with long skirt and blouse as a short dress would involve cutting out legs and worrying about shoes for them
  • then color in the skirt, blouse, hair using chalk pastels and markers, or cut scrap paper, or paints, glitter, just anything we fancy at the moment
  • then draw in a cute face - Ana made alien face, goofy face, face with goggles etc., just had fun with the few she made, and I enjoyed making the rest
  • Finally, glue on tissue paper wings at the back, add some glitter, and they are ready to cheer up the party!

At first, Ana started naming each of her paper chain fairies, making up stories about them based on her favorite characters so far. The one with the blue hair is called Madeline - she has a bridge on her skirt and is lifting up her shirt to show her scar in the tummy when her appendix was removed :) Yes, she has memorized Ludwig Bemelmans' Madeline and thanks to the Puffin Books' Madeline CD, she has picked up a few French words and songs. And holding Madeline's hands is the Pink Princess Faery who helps princesses look pretty and pink.

After about half-a-dozen, she just gave up and let them be whoever they wanted to be.


Ripped and Layered Tissue Paper (Découpage-style) Flowers and Butterflies:

Easy Kids Crafts, Paper Chain Faeries, Flowers, Butterflies
  1. Place a large piece of cling wrap or plastic bag flat on a large sheet of newspaper or drop-cloth on the work surface
  2. Then rip colorful tissue papers (preferably in some harmonious colors), place them in one layer, slightly overlapping, to cover the whole area on cling wrap; we went with pink and purple for some, and baby blue and pale yellow for some as we had those handy
  3. Brush on diluted white glue
  4. Add another layer of torn tissue paper and brush with diluted white glue
  5. Add as many as 5 or 6 such layers, sprinkle glitter, allow to dry
  6. Brush on some more diluted white glue to keep the glitter from falling off (this is a bit challenging as some of the loose glitter wants to stick to the brush), and allow to dry completely
  7. Peel off the cling wrap/plastic bag and now we have a beautiful sheet of thick colorful tissue paper to cut up shapes

Ana has been working on "complex cutting" according to her teacher, and as evidenced by the bits she brings home in her folder - lots of waves, zig-zags, complex shapes and such. So, cutting the flowers and butterflies was not too challenging for her. I simply drew the outlines, dark enough for her to just cut along the lines.

For the flowers, the elongated rounded petal shape seemed the easiest to cut, but any nice petal shape would be fine I'm sure. We cut out circles in contrasting color to glue to the center of the flowers. For the butterflies, of course, I folded the paper in half and drew the wing shapes, for symmetry, which makes it easier to cut. We can get fancy with the body, add beads, and embellish each one uniquely. We just went with cutting a rough body+antenna from marbled paper.

I had saved most of her art work from previous explorations - Marbling, Salt Sprinkled Paintings, Bubble Painting, Textured Papers - and we put them to good use to cut out flowers and butterflies.

As always, inspiration comes from many places. One of my favorites I mention here on and off is Usborne Book of Art Ideas. Many of these decorations are a direct result of easy-to-do ideas from this book, as well as Usborne Book of Fairy Things to Make and Do.


Fairy Wings with Tissue Paper, Cardboard, Elastic:
Easy Kids Crafts, easy kids craft fairy wings, Paper Chain Faeries, Flowers, Butterflies
This is an easy and fun project to do for a faery or butterfly themed party craft.
  1. Decide on the approximate wingspan - we used 26x12 inches for the top part and 22x10 inches for the bottom part of the wings
  2. Cut out a rectangular piece of tissue paper: about 26x12 inches for the top wings, and 22x10 inches for the bottom wings. Trim the rectangles if it feels too big. Accordion fold the top wing rectangle, gather and pinch the middle and tape it; do the same for the bottom wings; keep handy
  3. Cut a piece of cardboard rectangle about 6x4 inches or 5x7 inches; poke four holes about an inch from the edges to loop the elastic through
  4. Measure the elastic for the child who will be wearing it - we used two 16 inch pieces of 1/8th inch wide elastic, one for each loop that sits on the shoulder; it worked fine for the 2 yr old as well as the five year olds; it fit me just fine too :)
  5. Thread the elastic through the cardboard holes, as in the picture, and make a knot to secure them in place
  6. Position the tissue paper wings on the prepared cardboard, tilt the top wings upwards and the bottom wing downwards a bit, glue or tape the top and bottom wings to the cardboard to satisfaction. Voilà!

Some options:
  • Before gathering and taping the middle of the rectangular tissue papers to form the wings, we can shape the wings by trimming the edges appropriately. Or this can be done at the end, after assembling the wing, which is what we did, using pinking shears.
  • Also, can cut notches in the cardboard to match the shape of the wings so the cardboard is not visible as much. And, if the plain cardboard irks the senses, we can glue some tissue paper on it first before punching the holes and inserting the elastic.
  • If preferred, can use the découpage-style layered and glued tissue paper as made in the Tissue Paper Découpage Flowers and Butterflies section above for stiffer wings... the possibilities are many and the idea is to keep it simple for the kids to do
  • Instead of two rectangular pieces for the wings, can also take a largish rectangle, fold in half, trace out butterfly wing shape and cut it out to make butterfly-shaped wings

I was debating posting each project above on its own, but, seems like the underlying idea is the same so grouping them here...

Labels: , , , ,

Friday, February 12, 2010

Kids Art: Textured Paper

kids are textured paper painting

One of my favorites for art inspiration is Usborne Book of Art Ideas. It is brimming with ideas to try out for myself... and watching me do something new sparks Ana's interest and she usually follows the inevitable, "♫What are you doing?" with a tinkling "Can I help you do that?♫", and thus we end up doing a few new things on and off.

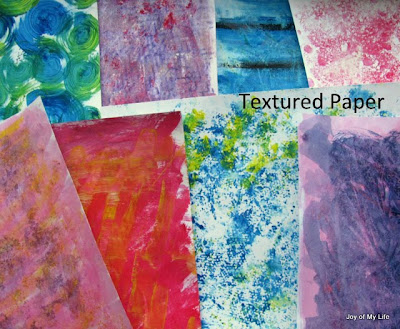
Anyway, one of the ideas from this book that I use frequently is to create textured paper - i.e., just paper with various textured patterns. The textured papers can then be used to create other art by cutting and layering.

I like this as it helps me use up the paints I dole out for the kids during art sessions - it feels criminal to waste paints. So, when they are done and have gone to wash their hands, I stash away the remaining paints to create textured paper, using more fresh paint as the mood calls for.

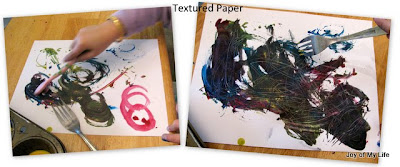
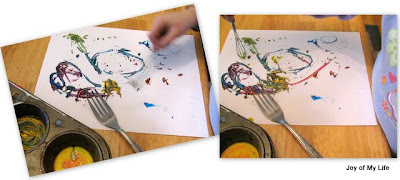
Every once in a while, Ana would join me to play around with creating textured paper. Her favorite is to use fork and child-size whisk to create patterns and textures. We use all kinds of paper from heavy-weight watercolor or bristol paper to card stock to butcher paper.

kids art easy valentine hearts on textured paper

We can either dry brush on several layers with directional brush strokes that show through, or use aids like corrugated edges of cardboards, natural sponge, cling wrap, or even fork or whisk for that matter, to create textures and patterns... swirls, stripes, blobs anything - Explore and Express is the mantra...

When the paper is dry, I save them for later use in other paper craft and art projects.

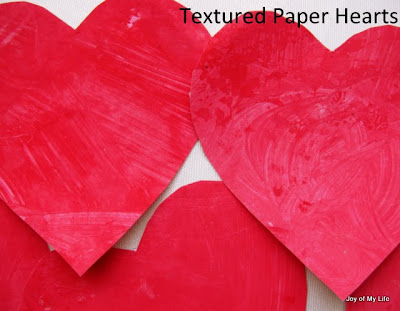
After the recent roll printing, we had quite a bit of red paint leftover. So, Ana used her hands, large brush, even a cotton textured washrag to spread the paint all over some white cardstock paper, and then cut out hearts to use for Valentine's Day cards for her friends. I love the textures and patterns she created - makes unique cards, even if they are all red and heart-shaped.

kids art easy valnetine's day hearts on textured paper

Sometimes, she likes to just play with different tools to see what patterns she can create and how she can repeat/reproduce it.

kids art easy textured paper

Anyway, maybe soon, I can share the few uses these textured paper have been put to... it seems like life is just boxed into some hectic rushed routine with just a small window for the cultivation of human spirit... and if I can inspire Ana and Og to recognize and nurture that part of their spirit by just fostering mine, I should consider it a blessing...

Labels: , , , , , ,

Saturday, January 23, 2010

Kids Art: Oil Pastel Resist

kids art easy oil pastel resist

We've been exploring resist painting on and off for a while now. First with crayons and wax candles, then with oil pastels (just the scholastic kind, which are not too expensive, and come in beautiful colors).

A firm believer in
I hear... and I forget
I see... and I remember
I do... and I understand
--Ancient Chinese Proverb
I try to provide some hands-on opportunities for my kids that not only exposes them to new experiences but enriches me with a better understanding of their strengths. I try. I don't always succeed, and there is always a lot to learn...

I remember, a few years ago, my 3 yr-old niece drew something that looked like a cross between a candy cane and a broom and exclaimed, "Horse!". And since then, it has been fun to see the "fairy" in Ana's squiggles and now the "sun" in Oggie's...

As described in a few books I was reading regarding art expression in kids, I like the idea of letting the child explore the textures, the interactions between various materials, and possibly allow for creative expression with an open-ended approach.

Incidentally, I've often wondered why "open-ended" has somehow come to connote lack of structure. Au contraire. Children work best within some sort of structure (so I've read and my observation so far seems to indicate the same). However, when the structure does not necessarily dictate the materials, method, and end result, I guess it is fair to denote it open-ended.

Initially, Ana just made scribbles on a piece of paper with crayons and painted over it with diluted tempera paints. Crayon resist or oil pastel resist, as the name suggests, resist the paints, which only shows through around the crayon or oil pastel lines.

Now, squiggles seem like a great way to explore lines - from straight lines to circle and every thing in-between.

Exploring continuous lines with same start and end points, or separate start and end points can in itself be a very rewarding exercise.

(Disclaimer: I am not an art expert, or even an early childhood education expert... I just enjoy reading about these topics from wonderful books and other resources, and exploring some of the ideas therein with my kids, which in itself is a great learning experience for me.)

Art Appreciation post in Saffron Tree lists some resources with good insight into the early creative process. In this context, Harold And The Purple Crayon brings some fond memories... especially when Ana drew Harold as holding his purple crayon standing at her easel in her room.

Some of the early chats I had with Ana about her chicken scratches was quite refreshing and eye-opening for me. I still treasure some of her special art expressions.

At 4¾, she has outgrown the abstract squiggles/swirls/doodles stage, itching to really represent - i.e., draw - the things she wants to.

She seems quite expressive sketching worlds and things from imagination. But, to represent something specific, something that she sees every day, to its likeness, seems a bit challenging. I don't want that to deter her from exploring or frustrate her in the process. We have started tracing exercises, just to demystify the drawing process.

Drawing is a specific skill that can be honed via proper technique and instruction when she feels ready for it. So, nowadays, when we look through books, she picks out the subjects/objects, then I sit with her and make rough pencil sketches to her satisfaction and hand them over to take it where she wants to. The impromptu "You are a good drawer, Amma!" makes me feel on top of the world sometimes.

She picks out her mode of expression at any given time: sometimes it is crayons, sometimes color pencil, sometimes markers, sometimes watercolors, sometimes chalk pastels, sometimes masking or any combination thereof. And sometimes it is this oil pastel resist.

Items Used: Oil pastels, watercolors, brush, heavy weight or card stock paper.

  1. Let the child make a sketch - can be swirls, squiggles, lines - just anything that the child wants to represent on paper (or, adult can make the sketch with the child's input)
  2. Apply oil pastel to the areas to be resisted by the paints. This could be the creative part the child gets to explore
  3. Wash with watercolors (or diluted inks or diluted tempera paints) all over the oil pastels and background
  4. Notice how the paints are resisted by the oil pastels;allow to dry

kids art easy oil pastel resist

Upon Ana's request, we've done some reptiles, some sea creatures, and will be working with butterflies and dragon flies next - whenever we are in the mood and the stars align themselves properly...

Some of Ana's color choices and representations look pretty dramatically stunning - at least to the maternal eye - while others just look like something Oggie threw up. However, it is the process , the experience, that I cherish more than the product, so, I treasure it all...

Incidentally, one of my favorites for art inspiration is Usborne Book of Art Ideas. It is brimming with ideas to try out for myself... and watching me do something with concentration and joy (and possibly effortless enthusiasm) hopefully inspires Ana enough to do her own exploration...

Labels: , , , , ,

‹Older