Tuesday, November 30, 2010

Kids Art: Mondrian-inspired Chalk Pastels

Kids Art: Mondrian-inspired Chalk Pastels and Paintings
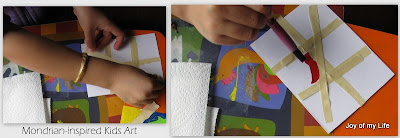
A while ago, a study in Masking led us to use masking tape and paints to create very simple paintings à la Mondrian.

Thanks to the suggestion by one of Ana's school teachers (an artist) to get Oggie started on it, I was happy to introduce this activity to him and notice the concentration and joy with which he created his "pieces".

I didn't restrict the palette to primary colors, nor insist on simple horizontal/vertical lines.

Kids Art: Mondrian-inspired Chalk Pastels and paintings

Items Used: Masking tape, card stock paper, chalk pastels

  1. On a piece of card stock paper, apply the (relatively inexpensive) masking tape in horizontal and vertical lines allowing them to intersect to form blocks
  2. Color with chalk pastel - a different color in each block created by these intersecting lines - and smooth/blend the chalk pastels with a finger
  3. Carefully remove the masking tape et voilà! A unique piece of art

Kids Art: Mondrian-inspired Chalk Pastels and paintings
Variations:
  • Ana liked tempera paints in primary colors, Oggie preferred chalk pastels
  • White and black paper for stark effects
  • Also, using ruler, create thick dark intersecting lines with black marker and color in the blocks in between using markers
  • For Oggie, I taped the paper to the table-top using one or two pieces of masking tape first so the paper won't move when he is blending the chalk pastels; then gave him pre-cut pieces of masking tape to place as he wanted
Other similar art activities:
  1. Chalk pastels: Glue and Chalk Pastel Art
  2. Masking: Rubber Cement and Water Colors


Labels: , , ,

Saturday, November 27, 2010

Look-Alikes Around the World

Look-Alikes Around the World Joan Steiner
Look-Alikes Around the World
by Joan Steiner

Ages: 4-8

Publisher: Little, Brown Young Readers, 2007

We've been eying a series of "Look-Alikes" books by Joan Steiner.

This set of cleverly crafted books showcase famous landmarks, domestic settings, urban sites, even The Nutcracker ballet, holiday scenes and so on, but with a twist: they are all constructed with everyday found objects created painstakingly by Steiner, designed by Stephen Blauweiss, and then photographed by Ogden Gigli!

The tag line "The more you look, the more you see" aptly describes what the book is all about.

Take a closer look at the cover image of Look-Alikes Around the World above. While the mind abstracts and concludes Taj Mahal, the fun just starts as we spy ballet shoes, brussel sprouts, white chocolate bars and various every day objects making up this composite. The pictures are more like puzzles, and "reading" them turns into an I Spy game before long.

Not all books in the series are well-suited for children. In this interview, author Joan Steiner shares that one of the most unusual objects incorporated in one of her scenes is a hand grenade in the first book.

However, I found the three other Look-Alikes books that I've chanced upon (besides the around the World shared here) to be a delight for the adult mind. Simple text tries to clue us in, and if we are still confounded, the Notes at the back of the book lists the items used in each picture.

While Look-Alikes Around the World is not quite as child-friendly as Look-Alikes Jr., Ana had a lot of fun "discovering" pretzels, cupcakes, slices of bread, ballet slippers and suchlike in the pictures. The book is presented as a sort of travel journal with brief entries on each page forming the text, while the carefully constructed pictures are either in a postage stamp or post card format.

One of my favorites was a socked foot with a door-stop looking like a stone statue in Easter Island.

I am in awe of Ms.Steiner's talent and hard work. The pictures certainly can fool an average adult at first glance, but best part is finding the items used in each picture.
[image source: amazon.com]

Labels: , , ,

Tuesday, November 23, 2010

The Pout-Pout Fish

The Pout-Pout Fish by Deborah Diesen illustrated by Dan Hanna
The Pout-Pout Fish
by Deborah Diesen
illustrated by Dan Hanna

Ages: 4-8

Publisher: Farrar, Straus and Giroux (BYR)

What do you do when you feel gloomy? When you think your only state of mind is perpetual cheerlessness? When your whole countenance remains frozen in this doleful expression?

That is what the pout-pout fish is experiencing when we first meet him.
Deep in the water,
Mr. Fish swims about
With his fish face stuck
In a permanent pout.

Can his pals cheer him up?
Will his pout ever end?
Is there something he can learn
From an unexpected friend?


One by one his ocean friends stop by and ask him about it, and all he can reply is
I'm a pout-pout-fish with a pout-pout face
I spread the dreary-wearies all over the place
Blub, bluuub, bluuuub


Until, at last, a lovely shimmering fish comes along and plants a great big kiss so that now, as we close the book, Mr.Fish buoyantly shares
I'm a kiss-kiss fish with a kiss-kiss face
For spreading cheery-cheeries all over the place.
Smooch, smooooch, smoooooooch


The Pout-Pout Fish is a treat to read aloud. The rhyming text with repetitive refrain along with the colorful and playful illustrations by Dan Hanna makes this ideal for the toddler in residence. There is quite a bit of drama with exaggerated expressions in the cartoonish rendering of this simple little fish and his pals. Plus plenty of opportunity to deliver the "Blub, Bluuub, Bluuuub" in comical tones with the little ones joining in the chorus.

While not every word in the book would make sense to a typical toddler, the underlying message that all it takes is for someone to share a hug, a kiss, a smile, a kind word to turn your frown upside down easily comes across.

Deborah Diesen's page with additional resources for this book is quite wonderful.

It seems like every other book I write about here is a firm favorite with the kids... but then again, unless it is much-loved and much-enjoyed, I don't see the point of sharing it here anyway :)

So, needless to say, Pout-Pout Fish has been read a zillion times over with much giggles and foot-tapping - by me and D to the kids, by Ana to Oggie, by Ana to herself, by Oggie to himself (recited, more like it), and of course by me to myself with open-jawed drool admiring how such a simple-looking book comes out of a single brilliant idea coupled with unbridled talent...

The overall blue color scheme of the book might have had something to do with Oggie's attachment to this book as he likes to claim that all things blue are his by default.

We read the recent sequel by the same team, The Pout-Pout Fish in the Big-Big Dark which talks about dealing with fear (of the dark) and overcoming it to help someone in need. After falling in love with the first book, I was steeling myself for a let down, but, not so at all. The sequel is every bit as wonderful!

[image source: Dan Hanna's bluebellylizard.com site]

Labels: , , ,

Sunday, November 21, 2010

Two Little Trains

Two Little Trains Margaret Wise Brown illustrated by Leo and Diane Dillon

Two Little Trains
by Margaret Wise Brown
illustrated by Leo and Diane Dillon

Ages 3-6

Publisher: HarperCollins

After reading Why Mosquitoes Buzz in People's Ears following CROCUS 2009, I came upon another book illustrated by the two-time Caldecott Medalists, the Dillons, called Two Little Trains.

It was bewildering at first to notice that the book was written by well-known Margaret Wise Brown, of the Good Night Moon fame (Ana's first bedtime favorite), wondering how on earth... until it dawned on me that this 1949 treasure by Brown was republished in 2001 with the cleverly interpreted illustrations by the Dillons that attracted me to this book in the first place.

I have not seen the original publication, so, am not sure what illustrations accompanied that edition. But, this particular version is packed with clever visual parallels that makes it a joy to savor.

A little colorful wooden toy train sits next to a gift box on the title page. Packed suitcases and a boxed/wrapped present wait on a platform where a train is about to board the passengers. Thus starts this wonderful journey:

Two little trains went down the track, Two little trains went west
With a puff, puff, puff and a chug, chug, chug, Two little trains to the west.


Each double page spread shows the two little trains undergoing similar adventures - one, a streamlined modern train with the passengers; the other, a classic wooden train, a toy for the little kid, the intended recipient of the boxed/wrapped present.

While the modern train is shown chugging along up the hill, through the tunnels in the mountains, and over the river with blobs of purple-gray oval trees, the toy train puffs along up the banister, through the "tunnel" made by a hard-bound book, and over a bathtub and on the kitchen counter near a bowl full of purple plums that match the size and shape of the purple-gray trees...

The illustrations and the rhythm of the text makes this book a treat to read. It is a bit challenging for me to describe in words the beautiful analogous images skillfully illustrated by the Dillons.

What's not to love about trains, especially if one is a toddler? Riding the local metro rail is a thrill for Oggie and he certainly is fascinated with trains, thanks to Santa's visit last Chrsitmas when he left the kids a wooden train set to share.

I fell in love with this book after the first second read when I started noticing the pictures.

Of all the pages, Oggie seems fascinated with the page depicting a black man singing in the West where a face on the moon dark as night is possibly singing a hushed lullaby. (Oggie is convinced that the man on the moon is singing Twinkle Twinkle Little Star).

Labels: , , ,

Saturday, November 20, 2010

Down With Darkness, Up With Light

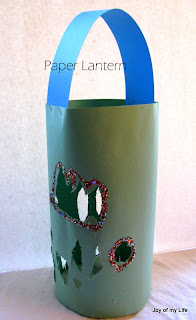
Otherwise known as "The Lantern Song", Down with Darkness has been ringing in our house for the last couple of weeks thanks to a school tradition for the kindergartners around this time every year in Ana's school.

Kindergartners make and decorate their own paper lanterns and do the Lantern Walk: hold a lit candle in the paper lantern, in the dark auditorium full of doting family and friends, and walk a full circle singing this song with such spirit that makes me hold my breath and wipe away the tears every time I watch it.

And this time, I had a huge big lump in my throat as Ana walked around with her lantern singing this beautiful song.

Winter Solstice and some sort of mid-winter celebration has been a tradition for many cultures around the world for centuries. Many schools adopt this Lantern Walk tradition, including Waldorf. There are possibly numerous undertones and religious connotations to these lyrics that make many people uncomfortable.

I neither support nor dismiss these mystic associations, nor endorse the anthroposophical philosophy in the context of this particular song, as it doesn't matter to my children at this point. The words, taken literally, without any hidden agenda, can be beautiful - especially "Each of us is one small light, But together we shine bright".

Having chanted this Sanskrit verse practically all my life, knowing the meaning and interpretation, I was wondering how to teach something like this to Ana without overwhelming her:kids craft paper lantern
Asato ma Sad gamaya
Tamaso ma Jyotir gamaya
Mrityor ma Amritam gamaya
Om Shanti Shanti Shantihi

Meaning of the phrases:
Asato-from unreal; ma-me;
Sad-to the real; gamaya-lead;
Tamaso-from darkness (of ignorance); ma-me;
Jyotir-to light; gamaya-lead;
Mrtyoh-from death; ma-me;
Amrtam-immortality; gamaya-lead;

Overall meaning:
Lead me (by giving knowledge) from the unreal to the real;
from darkness (of ignorance) to the light (of knowledge);
from death (sense of limitation) to immortality (limitless
liberation). -- India Divine

While entirely different in context, Ana seems to have her own simple interpretation of this song, singing joyously, just taking the words at face-value:

Down with Darkness (youtube video) by Emanuel Amiran
Down with darkness, up with light,
Up with sunshine, down with night.
Each of us is one small light,
But together we shine bright.
Go away, darkest, blackest night,
Go away, give way to light!

Labels: , ,

Wednesday, November 17, 2010

Kids Crafts: Fabric Color Transfer Fall Foliage Flag


Fabric color transfer projects are fun. Thanks to innovative tools that make these crafts accessible - like kids' fabric crayon (for art quilt blocks), photo transfer (for embellishing clothes) - it is easy for kids to create something on paper and then transfer it on to fabric that is not just stunning but also meaningful to them.

Ana likes to do crayon transfers on and off to customize her clothes (even undies). Fabric Crayons make this especially easy. Sometimes, we have a print on the fabric which we "color in" directly with the fabric crayon and heat set it. This is rather tiresome.

However, typically, we color a design on paper and transfer it on to fabric by ironing it on at the prescribed heat setting. Fairies being the favorite theme, Ana has decorated her plain pants and tops with crayon-transferred designs.

The catch is that these fabric crayons are better hand washed and air-dried as they fade easily after just one dryer cycle.


However, Fabric markers are my favorite tool - once dry, they can be machine-washed and dried, and manage to retain the color-depth quite well. I "drew" the outline and facial features with fabric markers in the flower fairy shirt in the picture, which is still clear and bright after many washes, whereas the crayon transfer has faded away.

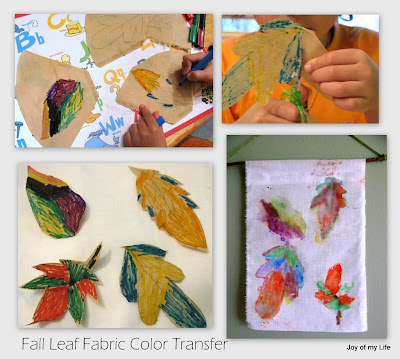
Anyway, another color transfer project we worked on recently is this Fall Foliage Flag: a simple white piece of fabric onto which we transfer colors from paper.

As always, inspiration comes from many places and we adapt the ideas to our available tools and interest. There are probably variations of this project on the web.

Kids Crafts: Fabric Color Transfer Fall Foliage Flag

Items used: white glue, regular markers, unbleached coffee filters or any other paper that absorbs marker colors well, scissors, long twig to serve as a dowel, plain cotton fabric (white or any light color), plastic bag, yarn or twine or raffia or some sort of string to hang up the flag

  1. Cut a 8x13 piece of fabric for the flag - any size is fine - I went with a smallish flag with a piece of scrap fabric I had
  2. Fold over one short edge and glue it down to make a loop through which the dowel can slide through and help hang the flag
  3. Trace various fall leaf shapes on to a piece of coffee filter paper (or any other paper); color them in with markers, blending two or more colors for that bright autumn look; trim around the leaf shape with scissors, if preferred
  4. Dilute the white glue with equal part water; apply a thin layer of this diluted glue onto the colored side of the paper; place this glued colored side down on the fabric; place a thin plastic bag or cling wrap over it; smooth down with hands to help the color transfer from the paper to the fabric
  5. Lift an edge to see if the transfer is satisfactory, else smooth down for a minute or two more; remove the plastic bag, and the colored leaf coffee filter paper
  6. Allow to dry and hang it up in a favorite spot. We left it indoors as the edges are unfinished and the gusty winds here might batter the fabric, possibly blow it away...

We noticed that
  • Darker color markers show up much better than lighter colors in the transfer
  • Depending on the marker's strength it is possible to get two transfers from each colored leaf
  • If making only one transfer from each colored paper, can prepare all the leaves first, then play with placement on the fabric, and apply glue to all the leaves at once and smooth down in one go to reveal the finished flag; the more the leaves the merrier the flag
  • As we used regular markers, not fabric markers, the colors run when we wash the fabric

Labels: ,

Saturday, November 13, 2010

Kids Crafts: Capture the Summer Shore


Autumn is beautiful. The burst of colors, the changes all around, the harvest bounty, the preparation for the colder months ahead... something to cherish and appreciate.

Autumn brings not just falling leaves, but falling rain for some of us. Lots and lots of rain. Now that we are in the thick of autumn, summer seems like a distant memory. As the soggy air and gloomy skies confines us indoors more and more, these simple crafts done as a farewell to summer lifts our spirits.

Beach-combing during summer was fun with Ana. We collected quite a few interesting items, cleaned and stowed them away, hoping to use them when inspiration hits.

Items used: shells, glue, construction paper, poster paper, scissors, tempera paints, toothbrush

Four simple projects: [clicking on individual images below shows a nicer, clearer picture]
  1. Beach Scene Collage
  2. Shell Butterfly
  3. Shell Wind Chime
  4. Recycled Foil Mobile
1.Beach Scene Collage


  • We tried this on black poster paper as well as white; poster paper is thicker than card-stock and can bear the weight of the shells better; of course any heavy paper would work well; I personally liked the black background for this collage.
  • Simply use the toothbrush to pick up and spray some paint to create the "sand".
  • Glue some shells, perhaps some dried moss; for the waves, we tried torn tissue paper on one, and wavy-cut construction paper in the other collage.
  • While the perspective and proportions are terrible, the boat on the ocean, looking out onto the shore on black background turned out to be our favorite
  • Cutting the crab was easy enough once I drew the lines for Ana, but, gluing it on wasn't as satisfactory so she enlisted my help.
2. Shell Butterfly


kids craft beach summer sea shells crafts collages
  • One of our beach-combing finds was a set of clam shells of varying sizes; as she tried different configurations for gluing it on the collage, she realized it looks like butterfly wings, which led to this little project
  • Again, we tried on black and white poster paper; clam-shell for one (which is hinged and folds in half usually), and two regular shells for another.
  • Apply glue to the butterfly body shape and shake some colorful glitter, allow to dry; or simply paint the body.


kids craft beach summer sea shells crafts collages

3. Shell Wind Chime
  • Some interesting driftwood and twigs were among our beach-combing finds; I liked this particular curly piece of wood to make a sort of mobile or wind-chime.
  • Simply tie the shells close to each other, using cotton yarn, at varying heights if preferred; any configuration is fine as long as two of them are close to each other so they can clang and make music when the wind blows.
  • Or, can string a small bell before attaching the shells for extra music


4. Recycled Foil Mobile

kids craft beach summer sea shells crafts collages
  • There is usually some aluminum foil from some baking or food wrapping for kids that, after a couple of uses, seems unfit for reuse; we clean and smooth some of them out as much as possible and store them for foil creatures.
  • Shape the foil, glue on tissue paper using glue diluted with water, allow to dry; add a layer or two of paint if preferred.
  • For the summer shore theme, we made sea stars, sea gulls and sea shells. However, can do pumpkins and apples for fall, stars and ornaments for the winter holidays... shaping is the tough part: Seagull was just a kidney bean shape and shell was sort of like a fan which Ana could handle; sea star was tricky for her (and for me) to shape, but was fun.

kids craft beach summer sea shells crafts collages

The wind chime and mobile have survived hanging on the deck during these past few weeks despite the gusty winds thrashing them around callously. And the collages cheer up the wall on the nook which I get an unhindered view of them every time I am in the kitchen; while the living room highlights the Autumn crafts we've been making...

We'd probably start on some holiday crafts after Thanksgiving, but, for now, it is nice to the have kids' work (well, Ana's mostly) capture the moods of the seasons...

Labels: , ,

Thursday, November 11, 2010

My Brothers' Flying Machine

My BrothersFlying Machine: Wilbur, Orville and me by Jane Yolen paintings by Jim Burke Saffron Tree Book review
My Brothers' Flying Machine: Wilbur, Orville and me
by Jane Yolen
paintings by Jim Burke

Little, Brown and Company, 2003

Ages 4-8

The Flying Machine, an airborne chariot capable of transporting man through the domain of Zeus himself, had a profound and historic significance in mankind's progress in the recent centuries.

In the era of airplanes, stealth fighter jets, space shuttles and deep space probes, it is not easy to impress upon the young minds about the time before, when all this was nothing short of magic. Much like all scientific revelations, until the framework and references are in place, it *is* magic. And magic begets more magic. Each tool, each technological advance builds on the previous until a critical point is reached when it is hard to stop its exponential growth.

My Brothers' Flying Machine tells the story of the Wright brothers' indefatigable quest for man to fly - through the eyes of their little sister Katherine. However, it is not a fictional account of Katherine detailing "How I helped my brothers build their first airplane". It is a creative retelling of historical facts, presented as a flowing text reminiscent of long and descriptive poems of yore.

"When the world speaks of the Wrights, it must include our sister. Much of our effort has been inspired by her." -- Orville Wright.

Katherine says she was four years old when Papa brought home a flying machine which Orv and Will immediately toss around with not-so-gentle hands. It breaks. And they fix it. They fix it so it works better than when Papa first brought it home.

With a first person account like this which said more than the mere words, the book immediately appealed to me.

Ana is a stage where she is quite interested in "real" people's stories - stories from my childhood, stories from when she was a baby, stories about other people who did interesting things in their life (Bottle Houses was a surprising favorite in this genre, while Wangari's Trees of Peace left quite an impression).

Katherine's strong personality and her staunch support for her brothers' endeavors makes her a veritable force, albeit a back-stage one, in the development of the Wright Brothers' Flying Machine.

Katherine's reference to fleeting nature of fashion regarding the hobble skirt, as well as her matter-of-fact statement about not being the first woman to fly were delivered beautifully. When finally it was her turn to fly, Katherine shares, "Wind scoured my face till my cheeks turned bright red. Then, I opened my arms wide, welcoming all the sky before me.", leaving us with the same exhilaration as we close the book.

Jane Yolen, an award-winning, much-respected and much-loved children's book author, has taken some rather complex ideas and made them wonderfully appealing and accessible to the young ones. After reading Mama's Kiss, Owl Moon, and How Do Dinosaurs... books by Ms. Yolen, My Brothers' Flying Machine came as quite a surprise for me in terms of the subject matter.

In A Note from the Author, Ms. Yolen states that both brothers have credited Katherine with having a hand in their success. In honor of Katherine's steadfast faith and support, in 1981 the Gates Learjet Corporation established a Katherine Wright Memorial Award to be given annually to a woman who provides encouragement and inspiration, behind the scenes, in aeronautics industry advancement, or to a woman who has made personal contribution to the art, sport, and science of aviation.

The paintings by Jim Burke capture the period, the mood, and the action beautifully. The soft lighting, the muted warm colors, and the full-page format that sometimes depict a view from the sky, sometimes zoom in on the intense expression of the brothers standing shoulder-to-shoulder, project a combination of grace and remoteness that is characteristic of historical portraits.

Labels: , , , ,

Tuesday, November 09, 2010

Kids Art: Folded Paper Paint Blobs

Kids Art: Folded Paper Paint Blobs
This folded paper paint blob activity was Ana's favorite when she was about 2½. Now that Oggie is 2½ I was curious to see if he would find it as interesting as Ana did. All I needed by way of motivation was a simple "you can try it with Oggie" which was suggested by Ana's teacher not too long ago :)

Their personalities are such that, whereas Ana never used to gush and talk non-stop at that age, Oggie is a chatterbox. So, he was able to tell me, "I love doing this blue rain drop paint. This is so fun."

Items used: colored 9x12 construction paper (or any other paper handy), scissors, tempera paints, dropper (I used an old medicine dropper)
optional: artist smock or apron, vinyl or plastic mat for protecting work surface
  1. Cut the construction paper in half or even smaller if preferred
  2. Fold each piece in half to make a crease so it is easy for the toddler to open and fold the paper
  3. Dilute tempera paint with a small amount of water so it is still thick not watery, but can be picked up with a dropper
  4. Open a pre-folded piece of paper, drop some paint blobs, fold back and smooth down with hands, open out again
  5. Voilà!

Kids Art: Folded Paper Paint Blobs

Since this particular dropper is easy for the little fingers to squeeze, Oggie wanted me to leave him alone so he can explore to his heart's content. It must've seemed like magic to him when he dropped some paint, folded and smoothed with his little hands, and opened it out to reveal not the drops he put in but something entirely different.

He did keep asking for more paper though. I had reserved 6 sheets of construction paper cut in half - 6 pieces for Og and 6 for Ana, but seeing Og's joy, Ana voluntarily gave up most of her papers explaining she gets to do it in school so she can forgo at home...

The best part for me is, after each paint blob "design", along the lines of the infamous Rorschach inkblot test, I wait for the kids to tell me what they see. Whereas Oggie saw a pair of seashells in one, Ana described the same as a person upside down with large owl-like eyes. One was a butterfly, another was a pair of mittens and so on...

I like the metallic tempera paints which have a nice sheen and look wonderful on dark paper. Oggie loves all things blue and asked for just the blue paint first.

For slightly older kids, can guide them to create a paint blob butterfly, with paint drops of various colors. Or for that matter, any other symmetric pattern as the folded paper makes it easy.

Of course, after the first 15 or 20 minutes of focused open-drop-paint-fold-smooth-down-open-again-lookit-i-made-a-<blah> it was inevitable that, "I have blue hands now" would follow as Oggie started smearing the paint all around and on himself. Which is fine with me. It's easy clean-up, washable, non-toxic tempera paints anyway and this gets him to learn about color-mixing...

The artist smock I had made for Ana when she was a toddler - sparingly used as she is such a neat and dainty worker - is quite handy for Oggie The Messy Boy.

I have a running list of favorite art activities for kids - things we explore first and if it happens to be a hit, we revisit on and off, spaced out enough to not become stale and repetitive. So far Ana's favorites seem to be:
print-making,
marbling,
melted crayon stained glass,
water color and cling wrap,
abstract masking - rubber cement, as well as using masking tape (à la Piet Mondrian)
oil pastel or crayon resist,
glue and chalk pastel,
bubble painting,
textured paper for using in larger cut-paper collage work

Maybe as I do more such art activities with Og, I can make a list his favorites to revisit as well.

Labels: ,

Friday, November 05, 2010

Thaathaa shuffled off the mortal coil

I have only mentioned my grandpa (thaathaa) a couple of times in the nearly 450 posts here - not because I had nothing to say, but precisely because nothing I say can really change anything except help me deal with my own feelings temporarily.

From his humble beginnings, of which I have only heard from my mom, after many struggles to face and overcome challenges life throws constantly, to his last days when all four of his children were near him, Thaathaa's life is worth a book. Much like any grandpa out there from his era.

And now that he has departed from the dimensions we can perceive, I feel quite heavy.


Labels: , ,

Wednesday, November 03, 2010

Earth Goes Round The Sun...

...once more since the last Penblwydd.

"How old are you, Mama?", she chimes sweetly.

"Oh, quite old, Ana, quite old", I side-step, defaulting to my state of deep-seated reluctance to acknowledge some facts of life I find inconvenient.

"I know. But, how old are you?" she persists.

"I am not sure, Ana. Ask Appa", I redirect tactfully.

"Papa, How old is Mama? Do you know?" she probes with the bull-dog spirit.

"She acts like she must be ninety-nine, Ana", he declares with nonchalance, adding, "Quick, help me get these candles on the cake we baked for Amma."

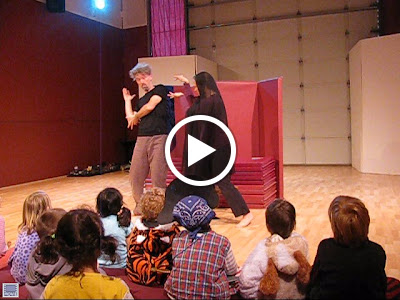
Besides the Blueberry Banana Cake and a book (standard "safe" present), I was glad we managed to watch a performance by a wonderful duo I had mentioned earlier: Mark and Melanya of the Play After Play. Since 2005, they have shared many folktales in their unique form of interactive storytelling, with a special feature at the end when children are invited to play.

This time they presented The Blue-Eyed Hare, A Gentle Halloween Tale From Scotland. As they say in their website, "Each story performance has its own sweetness with themes that reflect our values of kindness, interconnectedness and mindfulness." Here's short clip from the performance.


After the storytelling (play), children were invited to tumble and play safely. No compulsion. Parents are gently reminded not to urge the children to participate. So, Ana stayed on the floor with us, while Oggie enthusiastically played the whole time with Mark, Melanya and Kri, the playmates. (Cropped picture to protect privacy of other kids).


The small group and cozy enclosure made the children feel comfortable, connected and cheerful. No pressure. Not many rules except those for safe-play and courtesy. No shushing or reprimanding, which helped the children feel safe and respected.

Labels: , ,

Newer›  ‹Older