Kids Crafts: Fabric Color Transfer Fall Foliage Flag

Fabric color transfer projects are fun. Thanks to innovative tools that make these crafts accessible - like kids' fabric crayon (for art quilt blocks), photo transfer (for embellishing clothes) - it is easy for kids to create something on paper and then transfer it on to fabric that is not just stunning but also meaningful to them.
Ana likes to do crayon transfers on and off to customize her clothes (even undies). Fabric Crayons make this especially easy. Sometimes, we have a print on the fabric which we "color in" directly with the fabric crayon and heat set it. This is rather tiresome.
However, typically, we color a design on paper and transfer it on to fabric by ironing it on at the prescribed heat setting. Fairies being the favorite theme, Ana has decorated her plain pants and tops with crayon-transferred designs.
The catch is that these fabric crayons are better hand washed and air-dried as they fade easily after just one dryer cycle.

However, Fabric markers are my favorite tool - once dry, they can be machine-washed and dried, and manage to retain the color-depth quite well. I "drew" the outline and facial features with fabric markers in the flower fairy shirt in the picture, which is still clear and bright after many washes, whereas the crayon transfer has faded away.
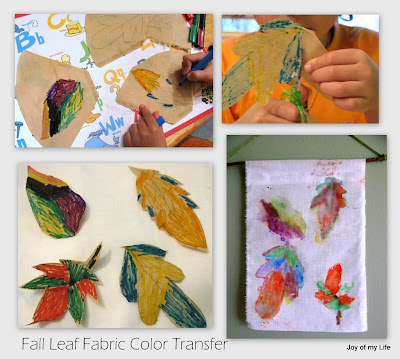
Anyway, another color transfer project we worked on recently is this Fall Foliage Flag: a simple white piece of fabric onto which we transfer colors from paper.
As always, inspiration comes from many places and we adapt the ideas to our available tools and interest. There are probably variations of this project on the web.

Items used: white glue, regular markers, unbleached coffee filters or any other paper that absorbs marker colors well, scissors, long twig to serve as a dowel, plain cotton fabric (white or any light color), plastic bag, yarn or twine or raffia or some sort of string to hang up the flag
- Cut a 8x13 piece of fabric for the flag - any size is fine - I went with a smallish flag with a piece of scrap fabric I had
- Fold over one short edge and glue it down to make a loop through which the dowel can slide through and help hang the flag
- Trace various fall leaf shapes on to a piece of coffee filter paper (or any other paper); color them in with markers, blending two or more colors for that bright autumn look; trim around the leaf shape with scissors, if preferred
- Dilute the white glue with equal part water; apply a thin layer of this diluted glue onto the colored side of the paper; place this glued colored side down on the fabric; place a thin plastic bag or cling wrap over it; smooth down with hands to help the color transfer from the paper to the fabric
- Lift an edge to see if the transfer is satisfactory, else smooth down for a minute or two more; remove the plastic bag, and the colored leaf coffee filter paper
- Allow to dry and hang it up in a favorite spot. We left it indoors as the edges are unfinished and the gusty winds here might batter the fabric, possibly blow it away...
We noticed that
- Darker color markers show up much better than lighter colors in the transfer
- Depending on the marker's strength it is possible to get two transfers from each colored leaf
- If making only one transfer from each colored paper, can prepare all the leaves first, then play with placement on the fabric, and apply glue to all the leaves at once and smooth down in one go to reveal the finished flag; the more the leaves the merrier the flag
- As we used regular markers, not fabric markers, the colors run when we wash the fabric
Labels: arts and crafts, fall


2 Comments:
Wow Sheela, I really like this. I'd love to give my daughter opportunities to 'transform' her own clothing.
HI Kristine, Good to see you here. The fun part is when Ana wants text in her shirt - to remember to write it on the back of the paper, flip the paper and trace it from the front so the text backwards as needed, and then transfer it to the fabric :)
Post a Comment
<< Home