Friday, April 30, 2010

Kids Games: Guess Who?

guess who? board game

Guess Who? vintage mystery/deduction game became a hit with Ana and me when we visited Nana recently - she had it ready for our visit. We liked it so much that we got our very own for Ana's birthday.

It is a very simple game: 2 players, each get a board with faces of 24 people, each having a unique name and clearly distinguishable features. The 24 faces on the board sit in slots that can be flipped up/down. At first each player draws a card which has the picture of one of the 24 characters on the board. The object of the game is to ask "Yes/No" style questions and guess the person that the other player has drawn. Whoever guesses first wins. And "guessing" is basically educated elimination based on answers to the Yes/No questions we ask.

It is explained in detail, and a lot better than what I am doing, here.

Ana loves to play this, especially with Appa. One evening, I casually checked on their game in progress and was smiling quietly when I observed this:
Ana: Does your person have light hair, Appa?
D: No.
Ana: Oh. I can knock down all the yellow hair and white hair people now.

That is the essence of the game, the strategy: phrase each question such that we can maximize elimination.

Questions we tend to rely on for initial round tends to be like: "Is your person a woman?", "Does your person have facial hair?", "Does your person wear glasses?", "Does your person wear a hat?"... something that would eliminate the population significantly each time, leading to the correct guess first, to win.

Initially, it seemed like it can get stale easily... after all, 24 cards/people and after 24 times (once for each), it can't hold much interest, right? Wrong. Each play is different, and asking the right questions for that play in proper order, not knowing anything about the person we are trying to guess keeps this interesting each time. Not to mention honing the deduction skills and studying the silly little faces trying to think up strategies...

Now, one little complaint I have is this particular version we bought needed assembly, is rather flimsy, has only 5 girls which leads to quick-ending plays if you draw one. The old/original version we played with at Nana's was much sturdier.

We have been quite selective about adding to kids' game shelf. Ana is just at the right age when she can understand and play by the rules. Candy Land at 3 seemed just right, even if she didn't start playing by the rules (and winning) until 4. Würfel-Zwerge is another great game for 3-4 year olds as it combines memory and observation skills to spot the right elf and claim it.

I remember a lot of board games from my childhood - some aren't even made anymore. What a pity. And my memory is so vague that I can't remember the name of the game, just a feeling, a shadow of a memory of how much I enjoyed playing it. One of them had a little toy soldier with a sword, we place him on a shiny smooth mirrored circle in the middle of the board and turn him; when he stops swirling, his sword points to something on the board, like a Trivia question...

Of course, there are tons of games out there - we have over a dozen that D and I like to play, Scrabble being top among them... am sure we'll be adding more as Oggie is old enough to join in. For now, this Guess Who? board game and "Guess the animal I am thinking of" verbal game are two of Ana's top favorites.

Labels: ,

Tuesday, April 27, 2010

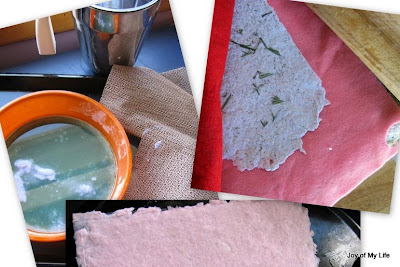
Kids Craft: Recycled Hand-made Paper

easy handmade paper recycled kids craft

Junk mail, envelopes, ripped wrapping paper & tissue paper, paper bits from complex-cutting exercises in school, copy paper/print-outs, art work papers that are gladly recycled as it was just exploration and the end-product doesn't make it to the memory box... all are fair game to be reused/recycled to make hand-made paper in our house.

A quick search on the web would provide the details and variations for making handmade paper at home. But, the basic idea, as explained to her dad by my five-year-old, is:
  • First we rip old paper into tiny bits so we can make new pretty paper
  • Then, we put the bits and water into the noisy mixie that Amma uses for making my smoothies
  • Then, we pour the oatmeal from the mixie into this round or square thing
  • It sits on top of the water in the tray, and Amma shakes it for a bit
  • Then she takes it out and presses it to squeeze out water
  • Then, she puts it on top of a pile of towels and felt and rolls the rolling pin
  • Now we have the new paper, which is still wet; so, we leave it out for drying


easy handmade paper recycled kids craft


The not-so-easy part about this process, for me at least, was to get the molds ready as suggested on the web. Size of the hand-made paper and its shape depends on the mold, naturally. And typically, a 5x7 or 8x10 old photo frame fitted with tulle or window screen seems like the standard approach.

I was looking for ways to use things I already have at home. Rather than stapling/gluing a piece of window screen to de-glassed old photo frame, a simple kitchen sieve along with gripper sheets cut to required size seemed to be a great alternative, for me at least, so far. And, a roasting pan becomes the water-tray for pouring and agitating the pulp to form the handmade paper.

easy handmade paper recycled kids craft

When Ana got her own paper-making kit from Santa last Christmas, we had a nice little wooden frame and tray that works well for small hands. Of course, the quality of the kit was rather inferior, as after the first few batches, the wooden frame started falling apart and the screen started fraying leading to agonies when we had to peel the wet paper off the screen to roll out for drying.

kids craft easy recycled handmade paper

Things I found useful:
  • Roughly measure the packed bits of paper, by volume, and add about 3 to 4 times the amount of water to make the pulp; too thick or too watery pulp naturally affects the finished paper
  • Allow the bits of paper to soak in the water before whipping to pulp
  • Sort papers by color for ripping and mushing them to pulp to create finished papers with distinct colors; else, it seems too muddled and "dirty", as Ana puts it
  • Place the frame in the water-tray preferably close to the top so the pulp floats; gently agitate to spread the pulp evenly - more pulp within the same mold results in thicker paper, naturally, but, too little pulp results in ripped 'hole-y' paper that is hard to take out and dry; I played with it a bit till I can just eyeball and adjust the amount of pulp needed
  • If using only white papers, can add a bit of food color or paint to tint the handmade paper
  • Can work in some glitter or pressed flowers or fresh herbs. I like to use rosemary, fennel, oregano and especially lavender leaves from our home-garden
  • Can stir in some hardy flower seeds to make it into a handmade seed-paper and send it to friends with planting instructions
  • Place the freshly squeezed hand-made paper from the mold between sheets of felt fabric placed on top of folded towels and roll with rolling pin to press out as much water as possible; this worked well as the wet hand-made paper peels off felt fabric very easily
  • If we can get it dry enough, can pick up the wet paper by the corners and hang them up for drying on a clothesline, securing the corners with clothespin
  • Add in small amounts of lint from the dryer, pieces of string, bits of colored paper etc. for an interesting finish
  • Sift through the web for other ideas; and keep experimenting with tools and technique for various textures and smoother finish

It is a labor of love. Each sheet of hand-made paper is processed one at a time, so, assembly-line precision is hard to achieve. Which is what adds to the beauty of each sheet, I think :) On a good day, without Ana's "help", I can make about 6 sheets of paper within half-an-hour to 45 minutes and let them dry overnight by the heating vent.

When D came back from Bhutan with pictures of handmade paper-making process there at the Institute of Zorig Chusum, as well as a small gift package of handmade paper for me, I was smitten.

I know this is more of an indulgence... in today's busy life, it is just as easy to send our papers to the Recycling Center and go out and get hand-made paper from the store to satisfy our art/craft purposes... and we still do that, and don't think there is anything wrong with that.

But, the satisfaction of making a few, and sending it to friends with whom I share similar fondness for paper products and crafts, and showing my daughter hands-on how the slogan Reduce-Reuse-Recycle can be adopted in our daily lives, seems to make it worthwhile.

Of course, Ana is not quite at the stage where she can complete the whole process of paper-making independently, but, I like that she likes to help: rip paper to bits, pour the pulp onto the frame, roll the rolling pin briefly... she seems to get the general picture of the process.

And, this lead to discussions about other ways of making paper - especially the papers we use in the first place to make these hand-made ones :)

Now, we have a dedicated little carton into which she stows away paper she wants to recycle and remake into handmade paper. And, she thinks twice about doodling in her art notebook or easel paper - choosing to use the whiteboard rather than "wasting" paper. So, between this and the compost habit, she seems to be on the right path to taking care of Mother Earth.

easy handmade paper recycled kids craft

Some uses we've put these papers to:
  • Send seed-paper cards as Spring greetings to friends and family
  • Embellish with buttons, raffia, even simple embroidery and turn them into unique greeting cards or works of art
  • Use some for interesting cut-paper and torn-paper collage, painting/coloring them as needed for the project.


Labels: ,

Sunday, April 25, 2010

Miss Rumphius

Miss Rumphius barbara cooney book review saffron tree
Miss Rumphius
by Barbara Cooney

Ages 4-8

Thanks to a fund-raising event in my daughter's school, we got our very own copy of Miss Rumphius, with a personal inscription from Ana's teacher, and it has quickly earned a special place in our bookshelf.

Little girl Alice narrates the story of her great-aunt, Miss Alice Rumphius, who is now known as The Lupine Lady.

Once upon a time, little Miss Alice Rumphius lived in a city by the sea, with her grandfather who came to America many years ago. She seems to have a special bond with her grandfather, listening to his stories of faraway places and assisting him with his paintings.

On her grandfather's knee, she declares that when she grows up she too will travel the world, and she too will live by the sea, very much like her grandfather.

The grandfather says, "That is all very well, Alice. But, there is a third thing you must do."

And what is that? "You must do something to make the world more beautiful", he says.

And that is exactly what Miss Alice Rumphius sets out to do. She travels the world, meets many people and makes many friends. And finally, after injuring herself while climbing down from a camel's back, she finds a place by the sea for a quiet life.

But there is still one more thing I have to do, she tells herself. The world is nice as it is. What can I do to make it more beautiful? she wonders...

Little Alice then tells us the story of what her great-aunt Miss Alice Rumphius did to make the world more beautiful, and earn the nickname The Lupine Lady: she scattered lupine seeds everywhere, and let the blue, purple and rose-colored lupines make the place more beautiful.

"When I grow up, I too will go places and then come back home to live by the sea", little Alice tells her great-aunt.

Predictably, great-aunt Miss Alice Rumphius says, "That is all very well, Alice. But there is a third thing you must do. You must do something to make the world more beautiful."

Little Alice leaves us with, "But I do not know yet what that can be".

The illustrations of the seaside and faraway places are beautiful. The last page describes how they were done.

I liked the fact that Miss Rumphius broke the stereotypical role of wife, mother, grandmother and set out to do what she really wanted to do in life. I also liked that rather than just living in this world, taking what we can from it, we are urged to ponder on how to give back. That's two powerful messages, delivered very simply: Follow Your Dreams and Make The World A Better Place For All.

Every time we read this book, I naturally ask, "What would you do to make the world more beautiful, Ana?" And at times, I am quite surprised by the answer. When I came across this Book Lady , I told my daughter about how the Book Lady made the world more beautiful by sharing books. And we talk about what "beautiful" means - not just visually pleasing, but something more.

And, she has been pretty vocal about not living in this house with us when she is a grown up, but, exploring/traveling the world and living in faraway places. This book seems to have made a rather deep impression on her.

There were a couple of minor things about the book I was not terribly comfortable with. Early on in the book, the grandfather, an artist, carves "Indians out of wood to put in front of cigar stores". This bothered me at a couple of different levels.

One other minor point of confusion was the names of the narrator and the subject of the book - they are both named Alice. The story starts out with little Alice introducing The Lupine Lady to us. But, when she proceeds to narrate the story of The Lupine Lady, we read that she was a little girl named Alice. To my five year old, this required a bit of sorting out. A minor point, as noted, but, am not sure if the identical names add to the story.

Not much is said about Miss Rumphius' parents which led my daughter to wonder about them. Perhaps they died, perhaps they were in a faraway place... it gives an open lead for us to explore while reading the book.

Just the simple act of scattering the seeds and waiting for the blossoms to uplift the spirits seemed inspiring. Lupines are wonderful, they help fix nitrogen in the soil, many are annuals, and they are pretty. But, I was thinking about ecological balance, invasive plant species and consequences of changing the landscape without due thought... and concluded that I should save that sermon for later ...

[This post written for Saffron Tree]

Labels: , ,

Wednesday, April 21, 2010

Volcanoes

volcanic eruption

The timing, while unfortunate, seems to have synchronized somehow: We recently read The Magic Treehouse #13 Vacation Under The Volcano. Ana has been learning about volcanoes in school this month. And, a real live eruption in Iceland to impress the reality of it.

Why did the dust go all the way to France? Is France closer to Iceland than here? Will we get any dust from Iceland volcano? Did children die in Iceland because of the volcano? Will babies in France choke because of the dust? How do we know volcano won't happen near our house?...

The house has been ringing with questions. We've seen some videos online of erupting volcanoes, especially the Iceland one with all the ash, and the closer-to-home old Mount Saint Helens. After studying some pictures of erupting volcanoes, she decided to paint one herself. (The glitter in the painting made me smile, despite the gravity).

On our drive around town, we can clearly see Mount Hood ("pointy top") and Mount Saint Helens ("flat top") and we talk about these imposing structures. She seems fascinated with Mount Saint Helens, thanks to the little fridge magnet souvenir we have that shows the before/after picture of the mountain - the top that was blown off during a volcanic eruption not too long ago. Looks like an excursion to Mount Saint Helens is imperative.

Labels: ,

Tuesday, April 20, 2010

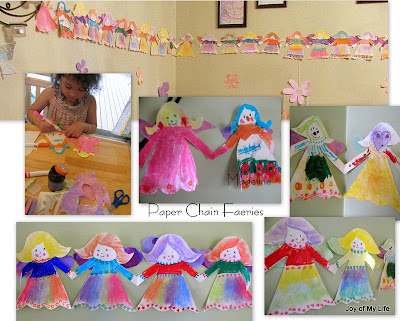
Kids Crafts: Paper Chain Fairies, Fairy Wings, Flowers, Butterflies

Easy Kids Crafts, easy kids craft fairy wings, Paper Chain Faeries, Flowers, Butterflies
Ana was excited about making decorations for her birthday party.

Paper Chain Faeries was the most fun, at least the first dozen or so that she helped make. Basically,
  • fold the paper a few times and cut out the shape making sure to leave the hands attached so it opens out to form the chain; we went with long skirt and blouse as a short dress would involve cutting out legs and worrying about shoes for them
  • then color in the skirt, blouse, hair using chalk pastels and markers, or cut scrap paper, or paints, glitter, just anything we fancy at the moment
  • then draw in a cute face - Ana made alien face, goofy face, face with goggles etc., just had fun with the few she made, and I enjoyed making the rest
  • Finally, glue on tissue paper wings at the back, add some glitter, and they are ready to cheer up the party!

At first, Ana started naming each of her paper chain fairies, making up stories about them based on her favorite characters so far. The one with the blue hair is called Madeline - she has a bridge on her skirt and is lifting up her shirt to show her scar in the tummy when her appendix was removed :) Yes, she has memorized Ludwig Bemelmans' Madeline and thanks to the Puffin Books' Madeline CD, she has picked up a few French words and songs. And holding Madeline's hands is the Pink Princess Faery who helps princesses look pretty and pink.

After about half-a-dozen, she just gave up and let them be whoever they wanted to be.


Ripped and Layered Tissue Paper (Découpage-style) Flowers and Butterflies:

Easy Kids Crafts, Paper Chain Faeries, Flowers, Butterflies
  1. Place a large piece of cling wrap or plastic bag flat on a large sheet of newspaper or drop-cloth on the work surface
  2. Then rip colorful tissue papers (preferably in some harmonious colors), place them in one layer, slightly overlapping, to cover the whole area on cling wrap; we went with pink and purple for some, and baby blue and pale yellow for some as we had those handy
  3. Brush on diluted white glue
  4. Add another layer of torn tissue paper and brush with diluted white glue
  5. Add as many as 5 or 6 such layers, sprinkle glitter, allow to dry
  6. Brush on some more diluted white glue to keep the glitter from falling off (this is a bit challenging as some of the loose glitter wants to stick to the brush), and allow to dry completely
  7. Peel off the cling wrap/plastic bag and now we have a beautiful sheet of thick colorful tissue paper to cut up shapes

Ana has been working on "complex cutting" according to her teacher, and as evidenced by the bits she brings home in her folder - lots of waves, zig-zags, complex shapes and such. So, cutting the flowers and butterflies was not too challenging for her. I simply drew the outlines, dark enough for her to just cut along the lines.

For the flowers, the elongated rounded petal shape seemed the easiest to cut, but any nice petal shape would be fine I'm sure. We cut out circles in contrasting color to glue to the center of the flowers. For the butterflies, of course, I folded the paper in half and drew the wing shapes, for symmetry, which makes it easier to cut. We can get fancy with the body, add beads, and embellish each one uniquely. We just went with cutting a rough body+antenna from marbled paper.

I had saved most of her art work from previous explorations - Marbling, Salt Sprinkled Paintings, Bubble Painting, Textured Papers - and we put them to good use to cut out flowers and butterflies.

As always, inspiration comes from many places. One of my favorites I mention here on and off is Usborne Book of Art Ideas. Many of these decorations are a direct result of easy-to-do ideas from this book, as well as Usborne Book of Fairy Things to Make and Do.


Fairy Wings with Tissue Paper, Cardboard, Elastic:
Easy Kids Crafts, easy kids craft fairy wings, Paper Chain Faeries, Flowers, Butterflies
This is an easy and fun project to do for a faery or butterfly themed party craft.
  1. Decide on the approximate wingspan - we used 26x12 inches for the top part and 22x10 inches for the bottom part of the wings
  2. Cut out a rectangular piece of tissue paper: about 26x12 inches for the top wings, and 22x10 inches for the bottom wings. Trim the rectangles if it feels too big. Accordion fold the top wing rectangle, gather and pinch the middle and tape it; do the same for the bottom wings; keep handy
  3. Cut a piece of cardboard rectangle about 6x4 inches or 5x7 inches; poke four holes about an inch from the edges to loop the elastic through
  4. Measure the elastic for the child who will be wearing it - we used two 16 inch pieces of 1/8th inch wide elastic, one for each loop that sits on the shoulder; it worked fine for the 2 yr old as well as the five year olds; it fit me just fine too :)
  5. Thread the elastic through the cardboard holes, as in the picture, and make a knot to secure them in place
  6. Position the tissue paper wings on the prepared cardboard, tilt the top wings upwards and the bottom wing downwards a bit, glue or tape the top and bottom wings to the cardboard to satisfaction. Voilà!

Some options:
  • Before gathering and taping the middle of the rectangular tissue papers to form the wings, we can shape the wings by trimming the edges appropriately. Or this can be done at the end, after assembling the wing, which is what we did, using pinking shears.
  • Also, can cut notches in the cardboard to match the shape of the wings so the cardboard is not visible as much. And, if the plain cardboard irks the senses, we can glue some tissue paper on it first before punching the holes and inserting the elastic.
  • If preferred, can use the découpage-style layered and glued tissue paper as made in the Tissue Paper Découpage Flowers and Butterflies section above for stiffer wings... the possibilities are many and the idea is to keep it simple for the kids to do
  • Instead of two rectangular pieces for the wings, can also take a largish rectangle, fold in half, trace out butterfly wing shape and cut it out to make butterfly-shaped wings

I was debating posting each project above on its own, but, seems like the underlying idea is the same so grouping them here...

Labels: , , , ,

Monday, April 19, 2010

Happy Birthday, Honey Pot!


"I don't feel like a five year old, Amma".

"Oh? Hm. How old do you feel?"

"I still feel like a four year old."

"I see. What do you think being a five year old feels like?"

"Umm... I don't know. It is not like a four year old I think. But I still feel like a four year old now, even though I already had my five birthday."

I wanted to tell her how much I understand the feeling...


Some of her friends came over to celebrate her birthday. We played some games; worked on some small craft projects; decorated our own butterfly cakes, made Strawberry mice and Ants on a Log (Snack made with celery, peanut butter and raisins) and ate as much as we wanted; and we ran around the backyard with our tissue paper faery wings... and stashed our prizes and crafts in fabric goody bags.

Then, to wind down the birthday weekend, Appa took the family to play by the Clackamas River in McIver State Park. Ana was the River Path Faery who, as the name suggests, would lead us on the path to the river, which she did.

A simple dinner of home-garden mint pooris with dal, and potatoes au gratin rounded out the dinner. The poories go down much faster when shaped like flowers and hearts and butterflies, naturally :)


Labels: ,

Saturday, April 17, 2010

The Story of the Root Children

the story of root children sibylle von olfers book review saffron tree
The Story of the Root Children
by Sibylle von Olfers

Ages 4-8

There is something timeless about Seasons. They come in cycles, we learn to expect them, we understand the phenomenon, we know what happens, and yet, we look forward to each one, year after year, knowing something is special this time.

And, there is something ageless about Sibylle von Olfers' century-old creation which hovers on the border of reality, with striking illustrations and imaginative tale that enchant the young and adult mind alike.

Impish little root-children are safely ensconced underground, with Mother Earth watching over their peaceful slumber, all warm and cozy, while the world above is frozen and dreary. As the snow begins to melt on the ground, Mother Earth, walking with a little candle underground, gently wakes up the root-children as Spring is coming and there's work to be done.

That's how the magic starts in The Story of the Root Children, originally published in German.

The root-children get busy: they sew fresh clothes, they wash and brush and paint the beetles and the ladybirds and the grubs, sprucing them up for the coming season... while the warm sun is busy above ground bringing new leaves to the barren winter trees. Would the root children be ready in time?

At last, it is Spring time and Mother Earth opens the door to the ground above - to the warm sunshine - letting the root-children march out in procession, following the ladybirds and the beetles, to go forth and do what they do best.

Summer comes and things get transcendental. Butterflies flutter by, bees buzz, crickets chirp, even beetles risk a dance. What fun!

But, Summer ends right on cue, leaving the sharp Autumn wind to blow the leaves down and call the root-children to hurry home to bed as Old Man Winter is coming. Mother Earth stands by the door that she opened not too long ago, greeting and hugging the root-children one by one as they head back underground to start their warm, cozy, deep winter's sleep.

This sweet, fanciful tale with charming illustrations certainly packs an everlasting appeal. At barely 10 inches by 8 inches, this unassuming volume has only 18 pages, with each double-page spread having at most a dozen crisp sentences on one page while the other shows ethereal images of the story in progress (except towards the middle, which shows a two-page procession heading out to welcome Spring).

Some of us prefer images of Mother Earth to be young, vibrant, ageless, all-encompassing... and some of us are comfortable whichever way she is represented - matronly, wise, weight of her experience heavy on her shoulders. The portrayal of Mother Earth in this book is rather that of a sweet and wise grandma, hunched yet strong... and it doesn't seem to have affected my daughter's sensibilities much so far. She loves to pore over the illustrations, taking particular delight in identifying the seraphic snowdrop and buttercup and forget-me-not as they sit sewing their new clothes, wondering why violet was afraid of a snail and why is it called Old Father Sliffslaff-Slibberslack, basking in the summer fun and flipping to the next page to see the nippy autumn winds blowing on the root-children's hair and clothes...

This book happens to have a special place in her book shelf and her heart. The rare surreal tone and the dreamy illustrations transport me to the world of the root-children, making the trip back to reality that much more jarring each time. Every time.

[This post written for Saffron Tree]

Labels: , ,

Wednesday, April 14, 2010

Play After Play

Thanks to the Calendar Fundraiser this year, Ana's school was able to bring an awesome theater event for the kids: Play After Play!

Melanya and Marc, the duo who make up Play After Play, have incredible bios. And from what I have gathered, they held the group of 60 kids spellbound with their unique style of storytelling that incorporates music and movement and interaction. And the folktale they shared was from Patagonia. Reminded me of Eth-Noh-Tec performance Ana and I enjoyed a while back.

In the play session after the Play, kids are invited to tumble and roll and "play like animals", but with safety and kindness, led by the duo with poise and grace.

For parents like me (and D), this is extremely fortuitous: with today's demands on life, such experiences for the kids take a back-seat while we go about meeting the Food-Clothing-Shelter needs.

As for Ana, she couldn't stop talking about it on our drive back from school - not so much the exact details, but, when every other word in her sentences turned out to be some synonym of "fun", I knew it must've been a good experience and has made a lasting impression.

Labels: , ,

Monday, April 05, 2010

Burl Ives Favorites for Children


On a whim, I had picked up Burl Ives Favorites for Children a couple of months back...

D, with his banjo playing and bluegrass leanings, inadvertently helped me open up to and enjoy folk music (although I admit, it is not my favorite, thanks to growing up with sublime Carnatic Music). So we dutifully and enthusiastically introduced folk/bluegrass music to Ana at about two-ish and I still can picture her bobbing and swaying to a superbly energetic rendition of Little Sadie at the Chinook Salmon Festival Oxbow Park.

Now not all folk singers are alike (thankfully) and not all folk music is charming - at least in my mind. The same song by different performers have a different appeal. Each rendition, with its arrangement and nuances, of a particular song, seems to resonate differently even with the same cross-section of the audience. Anyway, what I am driving at is that Burl Ives' rendition of the four songs and stories in this CD collection has captured our hearts forever.

The CD is a collection of four stories and four songs, one song following one story. Each story is short and is narrated with a charming folksy edge that it is hard to restrict it to kids. Now the song that follows the story is basically about that story, set to music, with cleverly constructed lyrics that make some of the folk songs so cheeky and masterful at the same time.

My favorite song therein, the one I listened in repeat-mode for days even when kids weren't around, is The Tailor and the Mouse. The voice, the inflection, the arrangement, the tempo, the bare-yet-typical lyrics, and the mood - cheery, playful, light, all fit perfectly to make this brilliant for me. I admit, I am not sold on the Hi Diddle Dee songs and have heard my share of them that grew stale at the first listen, but, there's something about this particularly spare lyrics and Ives' style that made a deep impression. Perhaps it was the timing and the mood that did it for me.

And, incidentally, as a grad student, I was a die-hard fan of Pinky And The Brain show on TV right from its debut day. I remember raving about it to one and all. Many of my friends then dismissed it as cartoon for kids. Oh, but it was not. It was just brilliant. Anyway, it was short-lived and after the show went off the air, I have tracked down episodes, watching them on and off. I was pleasantly surprised to revisit this particular episode, especially right after I was smitten with Burl Ives' delivery of Tailor And The Mouse.


Also in the CD, Ives' presentation of the popular Mr.Froggy Went A-Courtin' is superb - the little touches in the arrangement and his power as a folksinger make this the best version of the song I have heard. So far. And it is very rewarding to catch Oggie humming along "Mhmm, Mhmmm, Mhm" at the right places in the song, making his best impression of a bobble-head doll.

Ana's favorites happen to be the Sailor And The Crocodile, as well as The Witch At The Well, story and song. The Witch At The Well, the first story in the CD, caught Ana's attention right away. And, she picked up the song easily - suitably substituting the words she couldn't quite catch from the CD.

Now, being terribly busy, D barely gets to keep up with what the kids do. Unless I supply a sort of daily highlights (usually via email as we are all in bed when he gets home and he is out by 5 am, before we wake up), he probably would miss a lot of things that kids do... and he does manage to catch up on certain weekends, dedicating a few hours to spend exclusively with them... and, of course, he feels all caught up now with the recent Spring Break :)

Anyway, one Friday evening when the CD had just come into her life, Ana sang along with Ives fairly nonchalantly, as if this was something secondary to munching her popcorn on and off, very neatly rendering the song, copying Ives with careless ease, while Oggie bobbed up and down and all around matching the tempo. D was flabbergasted! I have no idea if I was beaming, but I am sure I wanted to when I caught his quizzical expression and held up the CD cover for him, by way of explaining the evening's entertainment by his very own budding folksinger and her tag-along enthusiast :)


Labels: , ,

Sunday, April 04, 2010

Pasg Hapus!


Since Ana arrived, Easter has come to mark a non-denominational spring celebration of sorts in our household. We color some eggs and have our own little version of egg hunt in the backyard.

The first year, we just hid the eggs around the house as it was terribly cold to let Ana wander around in the yard early Sunday morning. Now that Oggie is catching on fast, we feel motivated to keep up the tradition.

Over the last week or so, we read some Easter and bunny themed books. Here Comes T.Rex Cottontail (by Lois G. Grambling, illustrated by Jack E. Davis) seems to have appealed equally to both Ana and Og, among the casual picks. I didn't like it much, but that doesn't matter :)

Ana seems smitten with Rechenka's Eggs (Patricia Polacco) and wanted to color some of her eggs à la Babushka.

Just like last year, we went with mostly hard-boiled eggs for coloring, and some blown eggs for making into ornaments to hang indoors... we just used markers and food coloring, not much painting despite being inspired by Rechenka's Eggs.

And, typically, since we end up coloring way too many boiled eggs, I use them to make either a simple egg curry which kids don't mind or a spicy Gulai Telur which is D's favorite.


Labels: , ,

Friday, April 02, 2010

Flower Fairies by Cicely Mary Barker

Over a decade ago, I was quite taken aback when D gave me Good Faeries/Bad Faeries by Brian Froud, with his own inscription on each side for me to treasure.

I love the gorgeous illustrations of the whimsical fairies - there was a fairy for just about everything one can think of, including a Buttered-Toast faery... and they are not all conventionally pretty and sweet. Oh No. They revealed their true forms and identities to Mr.Froud who has so generously shown them to us.

I was particularly surprised at the statement D had penned in my copy to treasure, insisting with a straight face that he believes it to be true else he wouldn't dream of writing it... Well, with time, I guess I have proved him wrong about his fanciful assumption.

I am not sure D believes in the Little Folk and I am on the fence myself, slowly falling over to the sprightly side thanks to the unbridled enthusiasm Ana has shown for the past couple of years...

It was only a matter of time before Ana and I ran into the dainty little darlings who revealed themselves to Ms.Barker and let her share them with the rest of us through her beautiful art work... Flower Fairies have come into our lives and there is no way we will look at our garden in the same old way again.

And recently, thanks to Nana, we've started on the Flower Fairies™ Friends series of chapter books, adding to our own library.

Now, Rainbow Fairies were fun. But, we borrowed them from the library so we couldn't color in the illustrations. Besides, it was just Rachel and Kirsty on most pages, with a few goblins, and some fairies of course. So, we had more fun just sketching the Rainbow Magic™ fairies in our notebooks and coloring them in.

However, Flower Fairies™ Friends series has Ms.Barker's permission to reproduce some of her gorgeous flower fairies which we can color in. With Rose's Special Secret, Ana got quite involved and started coloring every page, even inviting me to add my touches.

Of course, even if the story introduces a mischievous Cornflower in dazzling blue, Ana doesn't feel constrained - she happily colored him in pink! And of course, Rose is not doomed to be pink and red, neither is Sweet Pea restricted to pea green bodice and pink skirt all through... they appear in full splendor sporting rainbow colors all through the pages.


I must admit, some of the illustrations are quite magical, making me want to color it in myself: when I open to a page at random and read something like using a fallen leaf as cover, she snuggled down in a small grassy hollow and soon drifted off to sleep... showing cute little Rose with short curly hair not much unlike Ana's surrounded by huge plants/bushes, I just can't resist :)


Labels: , , ,

Thursday, April 01, 2010

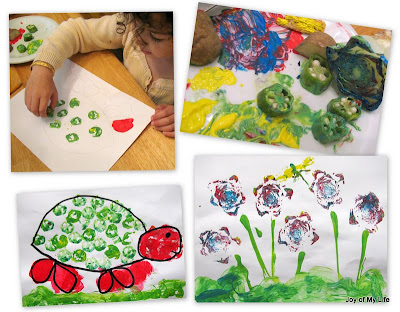
Kids Art: Vegetable Stamp Painting

kids art vegetable stamp printing painting with okra potatoes

Using cross-sections of vegetables for stamps and painting was an activity my mom introduced to me when I was young. My favorite then and now is still Okra and Potatoes - for art and eating :)

Of course, back then, it was quite a challenge for me to draw a design and cut it out in the potato or carrot cross-section, to make interesting patterns. It still is. So, I just use the flat surface here, devoid of any designs cut out.

Ana has done some stamping using vegetables when she was a little younger, just for fun, no real outcome in mind... just another toy/activity on a lazy weekend.

But now that she is exploring expression through available tools, and since I enjoy introducing her to some of my favorites from my childhood, it seemed like a good idea to revisit Vegetable Stamp Printing/Painting with a fresh perspective.

Since drawing is still challenging for the not-yet-five year old, she asks for my help to sketch the scene/object for her to work on... the left-brain still dominates so I just use symbols for drawing rather than the vibrant and detailed right-brained perspective some artists have managed to hone... but works fine for simple sketches for Ana to run with.

Anyway, this time, we wanted to work on one object up-close and one scene/landscape using the vegetable stamp painting. I went with the sturdy old tortoise for the up-close object as it lent itself well for the okra I wanted her to try.

Incidentally, I've always had this pet peeve about using the word "turtle" to mean usually-above-water "tortoise"... even though biologists refer to all chelonians as "turtles" - be it tortoises, turtles, or terrapins. For some reason, flat-shelled, underwater, fin-or-webbed-feet creatures are turtles, not to be interchanged with on-land, hard-scaly-feet, rounder-shelled tortoises, in my compartmentalized mind. It is only semantics, I understand, and am only nitpicking...

Items Used: cut vegetables like okra, potatoes, romaine lettuce bottom, tempera paints, cardstock paper, black marker.

kids art vegetable painting with okra and potato

I sketched a tortoise and gave her some cut okra and potato pieces and some paints. After she was done printing to her satisfaction, and adding any additional touches, with her permission, I went over the outline with a black marker to define the image.

In these sessions, anything is fair game for exploring as a "paintbrush" or "stamp" - vegetables, chopsticks, forks, butter knives, cotton balls, toothpicks, cheerios, even shredded wheat crackers - whatever is handy and comes to mind for representing a pattern or scene.

The bottom part of lettuce and other greens (even onions) make such a beautiful pattern that I had to suggest creating a flower garden scene with one. Chopsticks dipped in paint made the stems; okra loaded with paint dragged across the paper became the grassy meadow; pieces of shredded wheat cracker made the dragonfly wings.

It doesn't usually turn out to be a single painting to be worked on from start to finish, and then be done with it. Quite a few junk mail papers, envelopes, and Appa's note papers get stamped and painted on...

And sometimes, depending on her energy level and inspiration, we save it for later and add some touches till she feels she is done with it and asks me to put it in the drying rack.

Since we don't have any set schedule for art explorations or craft activities, we are guided only by our moods and timing. On some weeks we feel inspired and do a lot, then sit back and focus on other things for a while.

And, as she grows older, with her school life taking over most of her time, I am sure these sessions will become fewer... but, she would probably get inspired to express herself more on her own, leaving me to focus on my personal interests and goals.

By 6 or 7, I am sure she will be able to define her own design/theme/drawing to paint. For now, being not-yet-five, I am sure the finer details and the overall aesthetics are only secondary to simple exploration in her mind. And that is just fine.

Meanwhile, I am grateful for such occasional afternoons well spent. And hopefully she will remember it fondly some day...

Labels:

Newer›  ‹Older