Kids Crafts: Holiday Cookie-cutter Cards

These simple holiday cards using cookie-cutter shapes are easy enough for the resident 5½ year old to create independently. And, I enjoyed making a few as well.
The various Textured paper and Watercolor Cling Wrap papers we had made on and off came in handy to make easy and elegant cards.
Items Used: Cookie-cutters, double-sided tape, pre-folded color paper "cards", scissors, pencil, Watercolor Cling Wrap paper, pre-printed messages like "Season's Greetings" or "Happy Holidays" or "Joys of the Season" etc.
- Trace the cookie-cutter shapes on to the back of the watercolor cling wrap card, cut them out
- Use double-sided tape to apply this piece on to the front of the pre-folded card
- I like the double-sides tape as it is easy for a five-year-old to apply, and gives a nice extra dimension and depth to the card; but, we can just as well glue it on with plain old school glue, or use a piece of tape folded on itself to act as double-sided tape
- We used the printed messages on the inside - simply glue it on, add the greeting and signature to get the cards done within reasonable time frame. Alternately, can let the children add their own hand-written messages inside
Ana made a list first of friends she wants to send the cards to and systematically set about making cards while I worked on some of mine.
She was particular about decorating each envelope - choosing anything from elaborate oil pastel resist to Spartan stickers and rubber stamp designs.
Also, she had saved some Melted Crayon Stained Glass cards we had made last year, so she gave them away as well.
The care and joy with which she went about making them was just as rewarding for me as the finished product.
Aromatic Sandpaper Gingerbread Cookie Man/Woman cards

Items Used: Gingerbread Cookie Man/Woman shaped cookie-cutter or stencil, sandpaper, cinnamon sticks, star anise, cloves, crayons, puff paint, washable white school glue, glitter
- Trace and cut out the shapes on sandpaper
- Rub the sandpaper with favorite spices like cinnamon sticks, cloves etc.
- Decorate with puff paint, allow to dry overnight
- Remember to add a note to the recipient to scratch and sniff :)
- If preferred, gently color with sides of crayon to "trap" the rubbed-on spices before applying puff paint
- Instead of puff paint, can decorate with glue+glitter, buttons and beads
- (Note: Puff paint can be quite frustrating for small hands to apply with control)
Cookie-cutter 2-for-1 Cards:

Items Used: Card stock pre-folded cards in various colors, washable white school glue, glitter, pinking shears (optional), kids small craft scissors, cookie-cutters, Scotch™ tape, double-sided tape, "fancy" paper like Watercolor Cling Wrap paper or Salt Sprinkled Painted paper or any other Textured paper, (FOR ADULTS ONLY: X-acto knife, NOT FOR KIDS)
- Trace the cookie-cutter shape on the inside of the card front
- Adults: Use X-Acto™ knife to cut out this shape from the card if preferred
- Alternately, poke a hole along the traced outline large enough for the child to insert the small craft scissors and cut out the shape carefully, without ripping the paper
- Cut a square or rectangular piece of the "fancy" paper (we used watercolor cling wrap paper) with pinking shears that is large enough to cover the shape cut out from the card front and scotch tape it over the hole so this fancy paper shows through
- Use the cut out shaped piece to make another card: use double-sided tape for extra dimension; decorate with glue and glitter
- (Note: Pinking shears gives a nice decorative edge to the piece of watercolor cling wrap of paper we tape to the inside, so we leave this taped-on piece exposed. If preferred, can cover up this exposed taped piece of paper on the inside of the card)
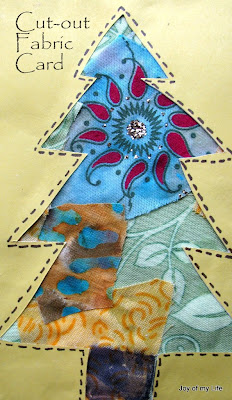
Cut-out Fabric Tree Cards

Items used: scrap fabric, glue, scrap paper, pre-folded greeting card paper, scissors, X-Acto™ knife (for adult use only), marker
- Glue scraps of fabric onto the scrap paper, allow to dry
- Trace and cut out tree shape (or any other shape) from the front of the greeting card
- Cut a large enough piece of the paper-backed patchwork fabric to cover the tree shaped hole, and tape it to the inside front so it shows through
- With a marker, draw small dashed lines along the shape to simulate running stitch
As always, inspiration comes from many places... certain articles online spark off ideas and help things come together for such projects.
Labels: arts and crafts, cards, holidays


4 Comments:
Great ideas and I loved the fabric card. Looks so beautiful.
Sheela, I always get tons of ideas to do with kids from your blog.
Thanks, Vibha, nice of you to say that!
you are so creative, sheela!!
Merry christmas and a happy new year to you and your loved ones!!
You are too kind, Kay, thanks! Merry Christmas and a Wonderful New Year to you and your dear ones too!
Post a Comment
<< Home