The intelligence of the creature known as a crowd, is the square root of the number of people in it. - Terry Pratchett

Thursday, December 13, 2012

Kids Craft: Potato-stamped Holiday Cards


It is that time of the year again - the Holiday Season! And, making cards is one of the favorite activities around this time. Penguins are still among the top favorites with Og so it was easy to settle on the theme for the cards.

The intent was to use some of the textured papers we've made over time, especially from Marbling and Bubble Printing, and make simple cards that are easy for the small hands to work on.

The Penguin cards we had made over the years made me rethink the theme, particularly the Potato Stamped Cards, but, I am glad I didn't. These cards turned out way more adorable than I had envisioned in my mind.

Items Used:
Potato, X-acto knife (for making the stamp)
Card stock papers - black and orangish yellow
home-made Suminagashi marbled papers
home-made Bubble print papers
glue stick
scissors - decorative edge and regular


1. Make the Potato Stamp. I prefer to do this alone, away from the kids. Cut the marbled and bubble printed papers to size, as needed.


2. Cut the layering card stock paper to size: I used black, my favorite. Cut the card stock for greeting cards: I had a stash of these bright orangish yellow that seemed a nice contrast to the black. Fold to make the card and keep the stack handy.

4. Assembly line precision seems to excite the little one. We start with a stack of cut-to-size marbled and bubble printed paper, stamp ink, and the potato stamp.

5. He stamps a piece of cut paper first and hands it to me. I add the beak and feet while he is stamping the next piece of marbled or bubble printed paper.


6. Then, one by one, he "colors in" the belly with white oil pastel so that the background does not show through.

7. He glues the finished penguin paper onto black cardstock layer and hands it to me. I glue this assembly onto the yellow greeting card.


8. All that's left to do is glue the "Happy Holidays!" pre-printed pre-cut messages that I had prepared over the weekend.

Voila! In a little over an hour from start, we are done with a set of unique yet similar cards, which we proceed to lay out on the table to admire :)


Since I am too lazy to make envelopes (and they get tossed out anyway), and since these cards are not going to be mailed out, I re-used some tissue papers that I had saved to wrap up the cards and secure it with a holiday sticker to be handed out to friends.


Labels: , , , ,

Wednesday, March 14, 2012

Kids Craft: "Pop-up" Penguin and Snowman Card


One mid-week night at bedtime reading  (which she does next to me on my bed while I read my book or knit or crochet, unless she requests that I read to her sometimes) she laid Ramona and Her Mother (the next book in the series she is currently into) down on the bed quite suddenly and reached for her "Ideas Book" and pencil which reside on the nightstand, always handy and accessible. You never know... some wonderful ideas have a way of popping into the head when in bed and it is a shame to not jot them down right away.

She scratched away with her pencil on the little Ideas Book, not letting me watch too closely. And then declared, "I had an idea for the card I wanted to make for Oggie's birthday, Mama, and I just had to write it down. I am going to make it this weekend and I didn't want to forget it."

Sure enough, she got to work that weekend - a weekend before Og's birthday - assembling the materials and shutting the door for that much-needed privacy to keep it a surprise for Og.

Of course, this closed-door policy is not for Mama: when I was in and out of that room quickly putting clothes away I glimpsed some salt sprinkling work going on; and when I was getting materials for my own project I noticed some cut paper of recognizable shapes; and when I went to get the puzzle that Oggie wanted to do I saw the assembly and gluing... so, although I tried not to peek, I couldn't miss it.

"So what? It's just a card", my mind tried to nay-say when I thought of writing a whole post on this. "It's not earth-shattering or uber-ingenious".

Why then have I dedicated a post to a simple card?

As I stared at the details and recognized the effort and was finally offered a few explanatory notes by Ana, I was touched by the thoughtfulness. Hopefully, Oggie gets to read this post when he is ready, and is able to better appreciate his sister's affectionate gesture someday, even if they get on each other's nerves and can't go 10 minutes together without being disagreeable.

  1. The salt sprinkled painting is the background ice; not just a colored background.
  2. The penguin pieces were cut out meticulously and assembled - the feet can be tricky to cut out.
  3. There are 4 penguins as Og is turning 4: each penguin has only one word to say which makes up the message of the card.
  4. And, not the least of all, the penguins are "pop-up" of sorts: a small accordion-folded piece of paper holds them up from the background giving the extra dimension!
She admitted that next time she would like to use a dark blue card rather than light blue as the salt-sprinkled icy terrain of the penguins are lost on this light blue background. Since we didn't have any dark blue, and white didn't seem special, she settled on the readily available light blue card seen here.

Oh, and the "pop-up" snowman says, "From: Ana" at the back of the card.


Labels: , ,

Tuesday, December 06, 2011

Kids Craft: Silly Penguins Greeting cards


Penguin is Og's best friend.

He loves everything about them, thinks they are silly. Spends the most time looking at them at the Zoo/Aquarium.

When the kids and I sat down to toss around ideas for Holiday cards, penguin among them, Og latched on to it, even remembering the "Penguin Works" - i.e., Easy Paper Penguin Cards we made last year.

Potato-stamped Penguins, Paint Blob Penguins and Fingerprint Penguin were a few options we considered before settling on this one.

This year, being a year older, it seemed like a good idea to add on layers to that Paper Penguin project and let him experiment with the parts.


It does take a bit of preparation to make the project less frustrating for the 3 year old. I was glad to have found this McGill Paper Punch for $2.99 at a neighborhood store and was happy to put it to good use.

But, if the paper Punch isn't available, can use stickers, or simply cut out paper feet like I did for the Easy Paper Penguin cards last year. Now, this Holly & Berries Punch makes a bow, a sock, a star, 2 holly leaves and berries of different sizes and we wanted to use as many of the pieces as possible.

Items Used:
McGill Holly & Berries Punch 92099
Black, Orange and White card stock or construction paper for penguin
Light blue or white card stock greeting cards - simply cut an 8½x11 paper as desired
Teal blue, lilac, light blue and sparkly white tissue paper (I used the scraps I had saved from wrapping presents)
Stick glue

The Wintry Effect was the basic background layer: tissue papers glued in layers on the greeting card face. Simply apply glue all over the front of the greeting card and paste the tissue paper, preferably cut to size. We implied a sort of horizon by overlapping dark color and the sparkly white tissue paper.


Next come the penguins on this icy landscape. The first couple started out as nice little guys - star-bellied and non-star-bellied, with bow-tie and a restrained charm.


Then, Oggie decided to let a couple of penguins go wild... if you notice the droppings from the penguin's bottom, I hope it brings a smile :) The left one below slid on the icy shore and landed in the ocean. the right one is gazing at the vast ocean while doing his business. (Og's interpretation, not mine).


Ana made a couple of "girl" penguins with bow on their head rather than the neck; and one who was pretending to be a moose.

All in all a fantastic hour and a half well-spent having good fun and getting a few Holiday Cards ready in the process!

Labels: , , ,

Wednesday, December 29, 2010

Kids Art: Winter 'Magic' Painting

oil pastel resist salt sprinkle kids art winter magic painting

We are overly fond of Oil Pastel Resist. (I am. Corollary: Ana is too.)

And we love the amorphous effect of Salt Sprinkled Painting.

This Winter 'Magic' Painting seems to be the latest trend in Ana's impromptu art works. It combines Oil Pastel Resist and Salt Sprinkled Painting in cool watercolors on heavy-weight paper to create winter backdrop for some of the layered/collage pieces, or even as stand-alone pieces.

White oil pastel on white paper creates the 'magic': Since white on white is practically inconspicuous at first, when we wash over it with inky watercolors, it reveals itself.

Dots, snowflakes, stars, piles of snow etc., even snowman were Ana's favorite... snow-laden evergreens, penguins on icy shores and such were some of the things I initially shared with her, nothing breath-taking. Most of Ana's creations became Thank You cards we sent post-Xmas.

oil pastel resist salt sprinkle kids art winter magic painting

Items Used: Oil pastels, water colors, faux sable #12 flat brush (or any brush - large flat brush makes the wash easier), common salt (in shaker to minimize mess/wastage), heavy weight paper (card stock is fine, but effects vary with paper weight); optional: scissors, pinking shears, double-sided foam adhesive tape, glue
  1. On white heavy weight paper, create some design/scene with white oil pastel for the 'magic' painting; (any colored oil pastel can be used for the scenery, reserving the white to depict snow/ice in the finished work)
  2. Use a large flat brush with inky watercolors to wash over it
  3. When it is still in the glossy state, not dry yet, but not soggy either, sprinkle salt on the wet watercolors just painted
  4. Allow to dry completely and brush off the salt


oil pastel resist salt sprinkle kids art winter magic painting

Some of the things we used this for:
  • Book Mark: Make Winter Magic Painting on a desired rectangular piece of medium heavy-weight paper; fold in half with a piece of Ric Rac ribbon or raffia in between, and glue together to make a book mark. For extra protection, I "laminated" it with clear contact sheet. For Nana, we glued one of the penguins Oggie made on this wintry background, and Ana wrote, "Happy Reading, Nana!", before I laminated it.

  • Cut-paper Collage: Cut out pictures from old greeting cards or wrapping paper, or create your own figures - we went with the ubiquitous reindeer, penguins, snowman, pine tree and suchlike. Glue them on with double-sided foam tape for that extra dimension. We made small 3x5 inch or 4x6 inch ones for greeting cards

  • Cards: Cut a 3x3 inch or so square using pinking shears with interesting edges; glue this with double-sided foam adhesive tape on to a piece of card stock paper that is slightly larger; then attach this combo to the front of a handmade paper card, with mild sprinkling of glitter where preferred

  • Rubber-Stamp: We created a whole 8x11 heavy weight paper with teal, indigo, lilac, purple Winter Magic Painting; when completely dry, add snowflake or any favorite rubber stamp in interesting colors. (As before, I like to use food-color inks for rubber stamping). Apply a gentle layer of glitter for that extra magic little girls love

As always, inspiration comes from many places. This combination of Oil Pastel Resist and Salt Sprinkled Painting can be be used for non-winter themes as well, using the white oil pastel to preserve the whites/light where needed.

oil pastel resist salt sprinkle kids art winter magic painting


Labels: , , , ,

Wednesday, December 22, 2010

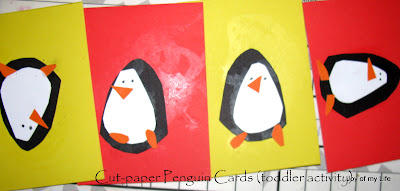
Kids Craft: Easy Paper Penguins

Kids Craft: Easy Paper Penguins

Penguins seem to have captured Oggie's heart, enjoying a special sort of attention only a toddler can command. This holiday season, while looking for easy cards Oggie can make, it was clear to me that it has to be either penguin or snowman. Penguin won, no contest.

Either construction paper or card stock will work. I went with card stock as it stays firm and withstands the pressure of the little hands without creasing much or tearing.

Kids Craft: Easy Paper Penguins

Items Used: Black, white and orange card stock paper, stick glue, pre-folded greeting cards preferably made out of thick card stock paper in various colors.

(†: Done by a grown-up for toddlers)
  1. †On a template paper, draw a lumpy egg shape with only one axis of symmetry for that extra cuteness. Or, symmetric oval or rounded triangle or any reasonably discernible penguin shape for that matter. Make a slightly smaller/larger template roughly the same shape
  2. †Cut pieces of black and white card stock using the appropriate templates
  3. †Cut small pieces for nose and feet from orange card stock, proportionate to the penguin body
  4. Activity Set-up for toddlers: In a tray, set up separate small shallow containers with the black, white, and orange pieces, and a stick glue along with pre-folded cards so it is easy for small hands to access and assemble
  5. Let the child apply glue on the front of the greeting card and place the black piece; apply glue to this black piece and stick the white piece on top; and finally apply glue to add the beak and feet, allow to dry
  6. †Add the eyes with a marker,or use googly-eyes if preferred
  7. Typically, for a specific outcome like this, I show Oggie what to do the first time to demonstrate clearly; it helps if the feet and beak are not too small, but since the stick glue was rubbed all over the card anyway, it was fine to pick up and reposition if needed

This "activity" became so popular he started asking for more... so, I used a few of these finished paper penguins to hang as decorations around the house - punch or poke a hole and attach a piece of thread/ribbon; or attach a piece of masking tape folded over on itself to form a double-sided tape and stick it to the wall. (Masking tape is gentler on the wall-paint than regular tape).

And a couple of them with added glitter and ribbons became Xmas tree ornaments.

Some of them, of course, went to family and friends with the warmest Season's Greetings.

For an older child, can prepare pieces of fleece or felt hats and scarves, even incorporate those cute flapless wings with the black card stock, so they can embellish the penguins whimsically.

Also, potato stamp penguins would make lovely cards for the Winter Holidays.

Paper Snowmen


Similar to the penguins above, paper chain snowmen or paper snowmen strung together make a simple decoration for the season. Alternately, use Watercolor Cling Wrap paper in light blue/teal as the background and glue the white snowmen on it for that snowy day effect.
  • Divide an 8x11 inch white card stock paper roughly evenly; draw as many snowmen as can be fitted without wasting paper yet leaving enough room to cut around; try different sizes to create a family
  • Use scraps of fleece, felt, flannel fabric to make hats, scarves, even mitts if making arms for the snowmen
  • Color in features with markers (puff paint adds dimension but is not easy for kids to control); embellish with beads or ribbons
  • String them together with ribbon


Labels: , , ,

Thursday, May 20, 2010

Kids Art: Potato Stamping

kids art potato stamps

A while back, I had introduced Ana to using vegetables (and other found objects) for stamping and creating some form of art.

Potato Stamps are fun if we can manage to carve out the required design. That part has always been challenging for me. I can manage simple designs, common shapes, but nothing intricate so far.

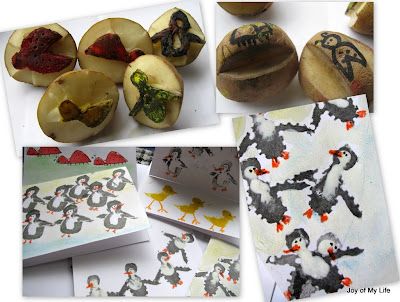
One soggy afternoon, both Ana and Og were playing with their respective penguin soft toys and wanted to create some art with penguins. Stamping seemed like something both the 5 year old and the 2 year old can do easily. So, I dipped into my bag of potatoes and decided to make simple penguin potato stamps.

kids art potato stamps penguins ladybugs

The first potato stamp I managed was technically the back of a penguin - convinced Ana that it is a penguin walking away. But of course, she wanted penguins jumping, sliding, looking goofy and walking towards us. So, we used ends of baby carrots dipped in white paint to add the white parts for the penguin. Then, orange crayon to add the feet and beak.

This one goes in the Save-For-Memory Box as I liked the explanation Ana had when she showed it to me after she was done: Penguins sliding down a snow hill, with one of them falling on top of the other at the bottom. It stuck in my head as she had deliberately stamped one penguin on top of another for this story. The background is done with chalk pastels over white paint.

kids art potato stamps penguins ladybugs

For Og, I decided to make the penguin with the white part carved out so he doesn't have to deal with carrot stamping for the white parts. After he was done with it on easel paper, Ana had a go at it making cards for her friends. Adding eyes, beak, and feet, giving each one a unique look, seemed like the best part of this activity.

kids art potato stamps penguins ladybugs

From there on, we tried ladybugs, chicks, ducks etc. - very simple shapes. I still can't carve well: Oggie most certainly wanted a T-rex, a Backhoe, a Dragon Potato Stamp and I couldn't quite do it, naturally - got the general outline that looked like a huge blob of some animal-ish figure... and Ana wanted a fairy, which is a bit beyond my current skills with X-acto knife and potatoes :)

But, considering the 50-odd little and not-so-little rubber stamps we have to meet all our stamping needs, I don't feel too terrible about not coming up with intricate potato stamps.

Also, I like home-made ink pads, especially for the little one's use: Drops of food color on a damp sponge... it stains the fingers a bit, but is washable and edible, especially since the little one puts everything in his mouth anyway. Plus, this allows for interesting effects when we put drops of different colors near each other on the same sponge - a multi-colored ink pad - and, a dab or so of water adds a nice effect - almost like inky paint.

And, with food color 'inks', I can rinse out and use the potatoes for cooking after a day as cut potatoes turn brown and start shriveling anyway :)

As always, inspiration comes from many places, but, for the most part, I love just about everything in Usborne Complete Book of Art Ideas book, including these penguins.

Labels: , , , ,

‹Older