I still remember the "Chinese Silk" saree my mom had when I was little... the fabric was delicately thin compared to her other South Indian silk sarees, with pale pink and cream "abstract design" as she called it then. Now, I can see the marbled textile that it was - unique, flowing, elegant, and gorgeous.
Marbling is thought to have originated in Japan around the twelfth century (suminagashi). It has evolved into its own
art form - a beautiful expression.
There are lots of techniques for marbling
paper and
fabric, ranging from fairly simple to quite complex.
I've been trying out a few marbling techniques with Ana over the last few months on and off. Shaving cream method and oil suspension method didn't get as much enthusiasm as this Corn Starch Size method.
The basic idea to make up a
size (thicker, more viscous base on which to drop the colors) started catching my fancy. Now, rather than treat the paper with alum, I just wanted to keep it simple and fun for the 4¾ year-old. That's how the
cornstarch method came to be the most popular in our household.
Items used: Corn starch, water, shallow baking pan, diluted tempera paints, dropper, easel or butcher paper, fork & old muffin pan (optional)
- Make a solution of cornstarch and water to about the consistency of thick buttermilk (I never measured so far) and pour into the shallow pan
- Use an eye dropper to drop diluted tempera paints (should be about inky consistency)
- Swirl the colors around with a fork, or leave it as blobs of colors - each produces its own pattern that is gorgeous anyway
- Very gently roll in a piece of easel paper onto the surface, allow to sit for about 15 seconds or so to absorb the paints, then roll the paper out and set it for drying on a flat surface
An old muffin pan is my favorite tool to hold the dilute paints for this - makes picking up with the eye dropper easier somehow. Of course, any little container(s) would work.
The first couple of times, Ana simply wanted to drop the paints and watch them swirl around. She didn't really want to
"catch it on paper"... But, when one of her
droppings resulted in something resembling Earth, with its moon to boot, her excited,
"Lookit! I made the Earth!" caught me reaching for the camera and clicking away.
She certainly wanted to catch this on paper, so I made the print to show Appa and stash away in the little memory box.
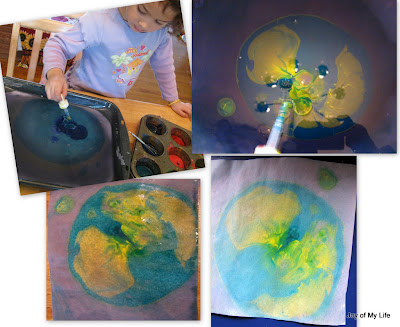
Of course, at a subsequent session, she wanted to recreate this magic, and got a bit frustrated. But, she managed to create other interesting designs to keep her cheerful and excited.
- Only one print can be made at a time, which is what makes each design unique
- After making a print, just use the fork to stir up the size in the shallow pan to make sure the corn starch stays suspended in water and does not all settle down at the bottom.
- As we add more colors the size solution will get murky, degrading the subsequent colors, so, replace it as appropriate. For our exploration sessions, we didn't mind the murkiness... Ana simply loved just dropping colors and swirling them about with the fork
- The paper used for print makes a difference, as expected - we didn't like the card stock or copy paper for this activity, the easel paper worked just fine
Marbling aka
"colorful swirlies" has made quite an impression on her, she even applied this technique when we
baked cupcakes recently :)
Printing aka "catching it on paper" can be a bit tricky for the little hands - Ana tends to push the paper down and immerse it in the size which didn't work well... so she enlisted my help for printing only those designs she was thrilled about.